DJI Mavic Air
Discover the important features of your ultraportable DJI Mavic Air with these video tutorials. Each video takes you through a process step-by-step in just a few minutes. See how to calibrate the IMU and the aircraft vision systems. Effectively link the remote controller. Learn to upgrade firmware by using either DJI Go 4 or DJI Assistant 2 and a PC. Record your activities and experiences by recording with SmartCapture. And mount propeller guards safely and securely.

Mavic Air, updating the firmware with DJI Go 4. Before updating ensure that the aircraft’s battery level is more than 50%. Power on the remote controller and aircraft. Launch DJI Go 4. A new firmware update is available is shown on the screen of the app. Tap the prompt to go to the aircraft firmware download screen. Tap download now. Do not power off the aircraft and remote controller or exit the DJI Go 4 during the update. Once updated an update complete prompt will be shown. Then tap OK. Restart the aircraft. Tap the firmware update status bar. A new firmware update is available prompt is shown. Tap it to enter the remote controller firmware download screen. Tap download now. Once updated an update complete prompt will be shown. Tap OK. Restart the aircraft and remote controller.
DJI Mavic Air |Updating the Firmware with DJI GO 4
Upgrading the firmware with DJI Assistant 2. Power on the aircraft. Connect the aircraft to your PC or Mac using the USB cable. Launch DJI Assistant 2. Enter your account and password to log in. click the Phantom 4 Pro box to enter the home screen. Click firmware update. Select the newest firmware version and kick upgrade. Click start update and the upgrade package will begin downloading. Once the download is complete upgrading will begin automatically. It takes about 15 minutes to upgrade. Please make sure your PC is connected to the internet and make sure the Phantom 4 Pro is powered on. Do not close DJI Assistant 2 or disconnect the USB cable during the upgrade. It’s normal for the gimbal to be powerless, indicators on the arms to flash and the aircraft to restart automatically. Please wait until the upgrade is complete. Once upgraded reboot the aircraft. If the upgrade fails reboot the aircraft and try again. If upgrading fails repeatedly please contact DJI support
DJI Mavic Air | Updating the Firmware with DJI Assistant 2
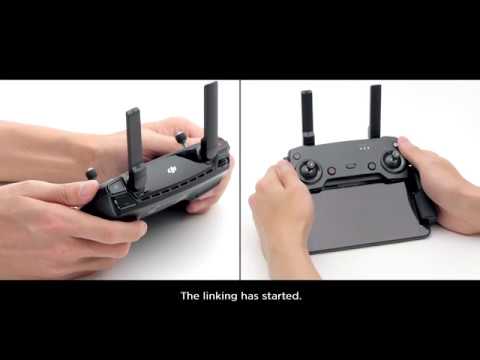
Mavic Air, linking the remote controller. If the status LED on the remote controller is solid red and the aircraft status indicator blinks yellow quickly then the remote controller needs to be linked to the aircraft. There are 2 ways to link the remote controller. 1. Linking the remote controller with DJI Go 4. Launch DJI Go. Tap enter device. Tap enter camera view. Tap the icon in the upper right corner of the screen and select remote controller settings. Tap linking remote controller and OK. When the remote controller makes a beeping sound the remote controller is ready to be linked. Press and hold the function button on the tail of the aircraft for about 3 seconds and release it until a beep is heard. The aircraft will start linking and the front LEDs will blink red quickly. When the beeping stops the status LED on the remote controller is solid green and the aircraft’s statues indicator blinks green the linking is successful. When a remote controller linked prompt is shown tap OK. 2. Linking the remote controller without a mobile device. Press and hold the function button on the tail of the aircraft for about 3 seconds and release it when a beep is heard. The aircraft will start linking and the front LEDs will blink red quickly. Press the flight pause button, function button and customizable button at the same time. Release them when the remote controller makes a beeping sound. The linking has started. When the beeping stops the status LED on the remote controller is solid green and the aircraft’s status indicator blinks green then the linking was successful.
DJI Mavic Air | Linking the Remote Controller

Mavic Air, activating the aircraft. Connect the battery to the charger to awake and fully charge it. Connect the mobile device to the remote controller. Power on the remote controller and aircraft. Ensure that the mobile device is connected to the internet. Name your Mavic Air, set a control mode. The default stick mode is mode 2. Select your preferred measurement system. It is also recommend to enable beginner mode if this is your first time flying. Confirm your activation account and tap activate.
DJI Mavic Air | Activating the Aircraft
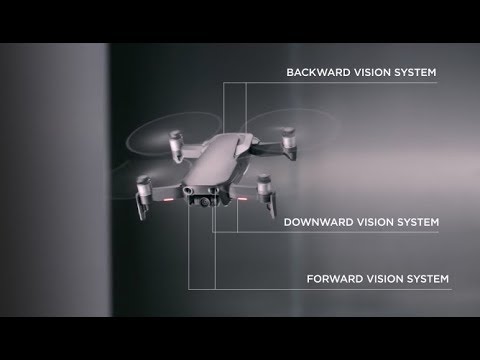
Mavic Air, calibrating the aircraft’s vision systems. There are 2 visions sensors on the front, rear and bottom of the aircraft respectively for positioning and sensing obstacles. The sensors have been calibrated before delivery. Power on the aircraft. Connect the aircraft to your PC or Mac with a USB cable. Launch DJI Assistant 2. Select Mavic Air. Log into your DJI account. Click calibration on the left menu bar and calibrate the forward vision system following the on screen instructions. Then calibrate the downward vision system following the on screen instructions. Calibrate the backward vision system. Then the aircraft will automatically start calculating. The calibration is complete
DJI Mavic Air | Calibrating the Aircraft Vision Systems
Mavic Air, Calibrating the IMU. Before calibrating the IMU unfold the aircraft’s arms and place the aircraft on a level surface. For safety reasons it is not recommended to push the control sticks to start the motors when removing the propellers. Launch DJI Go 4. When the aircraft is connected to DJI Go 4 enter main controller settings, advanced settings, sensors, tap calibrate IMU, tap start to enter the calibration screen. During the calibration position the aircraft following the on screen instructions and calibrate the IMU in 6 directions. After the calibration an IMU calibration complete restart aircraft prompt will be shown in the app which indicates that the IMU calibration is successful. If the IMU calibration fails restart the aircraft and try again.
DJI Mavic Air | Calibrating the IMU
Mavic Air, mounting the propeller guards. Before mounting the propeller guards ensure that the aircraft’s arms and front landing gears are unfolded. Open the buckle on the propeller guard. Connect the propeller guard with an LF mark to the propeller guard with an LF mark. When mounting the propeller guard note that there is a slot on the propeller guard as shown which is used for passing the guard through the front arm’s landing gear. Mount the propeller guard from the bottom of the front rear arm on the left side of the aircraft. Secure the buckle. Perform the same steps to mount the propeller guards with RF and RR marks. After the propeller guards are mounted check whether they are mounted in place. It is recommended to make the aircraft hover in place for 6 seconds before each flight. A propeller guard or extra payload detected. Flying performance will be affected. Fly with caution prompt will be shown in DJI Go 4.
DJI Mavic Air - Mounting the Propeller Guards
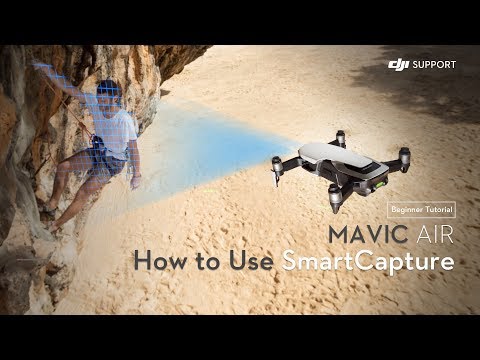
Mavic Air, how to use the smart capture. Smart capture offers a new way of controlling the Mavic Air by hand and taking photos or videos however you like. Gesture launch. Place the aircraft on a level surface, power it on and enable smart capture in DJI Go 4 or press the function button twice. The front LEDs will become solid yellow and the aircraft will beep twice. Stand at a distance of 2 to 3m in front of the aircraft, raise your palm for about 2 seconds and wait for palm control to be activated. Once palm control has been activated successfully the front LEDs will blink green slowly. The drone will take off and hover in place. Palm control. Stand at a distance of 2m in front of the aircraft and position your palm towards the camera for 2 seconds to activate palm control. The front LEDs will blink green slowly to indicate that palm control has been activated. Then you can control the aircraft with your palm. Control distance. Stand in front of the aircraft’s noise, raise and extend your arms and hold your palms closely together. The front LEDs will blink green slowly. Move your hands apart and the aircraft will fly away from you to a maximum distance of 6m. Move your hands together and the aircraft will fly towards you to a minimum distance of 2m.
Follow. Lower your hands towards the floor to activate follow. Once follow is activated the front LEDs will turn to solid green. You can select either trace or profile in the DJI Go 4 control your aircraft. With follow you can adjust the aircraft’s position and distance with your palm. Selfie. Stand at a distance of 7m in front of the aircraft and make a V gesture with 1 hand. When the selfie gesture is recognized a 3 second countdown will begin. With 2 seconds remaining the front LEDs will blink red slowly. Then with 1 second remaining the LEDs will start to blink red quickly. The front LEDs will turn off when capturing a photo. Group selfie. When making multiple V gestures at the same time group selfie will be activated. Mavic Air will take a photo at its current position. Then it will fly to a point 5m away from your group ascend and take a photo at a 30 degree angle. The aircraft will then fly to a point 7m away from your group ascend and take 1 more phot at a 15 degree angle. Finally it will fly back to its original positon.
Record videos. Stand at a distance of 7m in front of the aircraft and make a frame gesture with your finger. When the frame gesture is recognized the aircraft will start recording. During the recording the front LEDs will turn off. After 5 seconds have elapsed making the frame gesture again will stop the recording. Switching control. In smart capture the person controlling the Mavic Air can be switched at any time. Lower your hand towards the ground and the person who would like to control the aircraft should raise their palm in front of the aircraft. Once the aircraft is under their control the front LEDs will blink green slowly. Gesture land. To land the Mavic Air move your palm down slowly to make the aircraft descend to its minimum altitude. Continue commanding the drone to descend for a further 3 seconds, then it will land automatically and its motors will stop. The front LEDs will turn yellow and then the aircraft will wait for further instructions. Have fun using smart capture.
DJI Mavic Air | How to Use SmartCapture
