DJI Matrice 600
With its six powerful motors, rotors, and batteries, the Matrice 600 is a sophisticated aircraft with industrial and filmmaking applications. The M600 accepts multiple gimbal and camera configurations, so installation videos are finely detailed. Separate videos detail the installation of a Zenmuse X5 gimbal, with steps for mounting an X3/XT, X5 or X5R camera; installation of the Z30 zoom lens camera to the M600 Pro; and installation of a Z15-A7 gimbal. For filmmakers, one video shows how to mount a Ronin MX gimbal, which can support medium-format professional video cameras. Other videos detail installation of a focus motor expansion and remote start-stop feature; a D-RTK module for extremely precise positioning; and a remote controller channel expansion kit. Firmware upgrades are explained separately.
Matrice 600 Tutorials - How to Mount the Ronin-MX on the M600
Matrice 600 Tutorials - How to Mount the Ronin-MX on the M600
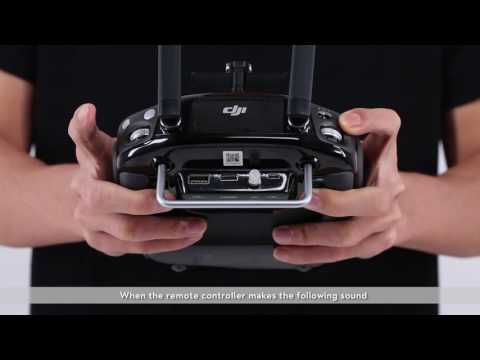
This video will show you how to setup the focus expansion module and remote start/stop. We will use the Canon 5D3 and the 24-105mm zoom lens as an example. Please make sure you have the following components: M600 and a Ronin-MX, a focus remote controller and motor, lens gear ring, focus motor expansion module, motor expansion module power and data cable and a follow focus mount. When using the motor expansion module with the remote start/stop the remote start/stop focus power and data cable should be used. Using the focus accessory support frame is optional. Linking the remote controller. Please make sure your firmware has been upgraded to the latest version. Remove the antenna from the remote controller (focus). Mount the motor expansion module and tighten the knob. Toggle the switch on the side to ON. The LED will blink red indicating that the expansion module is not connected to the Lightbridge 2. Turn on the remote controller (focus). Turn on the Lightbridge 2 remote controller and press C1, C2 and the record button. When the remote controller makes the following sound release all 3 buttons. Press the shutter button. The remote controller will make the following sound and the LED will blink green. Select menu, settings, connect RC then connect or use a tool to press the link button inside the hole at the top of the expansion module. The remote controller will start to link. When linking is complete the LED will turn solid yellow indicating that the expansion module is connected to the Lightbridge 2.
Connect the Lightbridge 2 remote controller to your mobile device and open DJI Go. When the app displays focus on the salve remote controller list connection is complete. Installing the motor. Fist mount the Ronin-MX to the aircraft. Then attach the motor. If necessary please use the focus accessory support frame. Choose a proper position according to the weight and center of gravity of lens and camera. Connect the expansion module power and data cable. Connect 1 end of the cable to the communication interface on the motor. Connect the other end to the P-Tap interface and Lightbridge interface. If you’re using the focus with the remote start/stop a special cable is required. Connect 1 end of the cable to the communication interface on the motor. Connect the other side to the PWR on the remote start/stop. Turn on all the devices. The LED will turn solid green indicating the motor expansion module can be used normally.
Focus Motor Expansion Module and Remote Star/Stop Setup
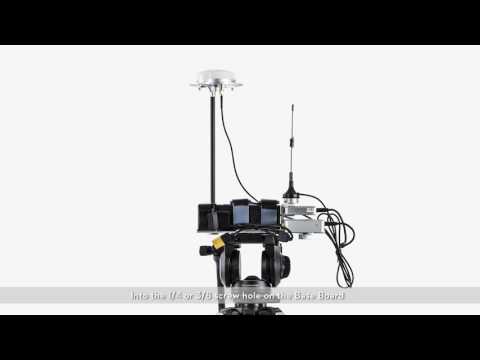
M600 Tutorials - How to Install D-RTK
M600 Tutorials - How to Install D-RTK
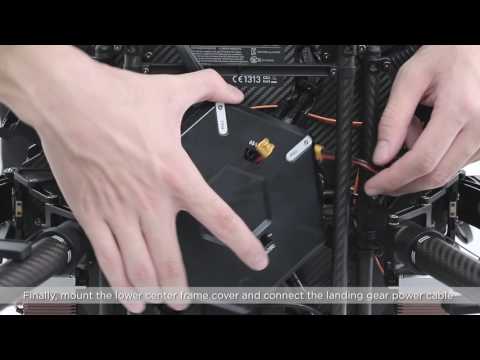
This video will show you how to mount the Zenmuse Z30 to the Matrice 600 Pro.1. Connecting the gimbal cable and attitude cable. First remove the GPS module on the nose. Then remove the upper center frame cover. Do not damage the fan cable. Remove he fan cable. Remove the GPS module CAN cable. Disconnect the landing gear power cable. Remove the lower center frame cover. Pull the video gimbal cable through the designated outlet on the lower center frame plate and connect it to the gimbal port on the Lightbridge 2. Pull the gimbal attitude cable through the designated outlet on the lower center frame plate and connect it to the CAN port on the A3 flight controller GPS. Then connect the GPS CAN cable. Connect the fan cable. Mount the upper center frame cover and the GPS module. Finally mount he lower center frame cover and connect the landing gear power cable. 2. Mounting the Zenmuse Z30 gimbal mounting plate. Secure the rear bracket and the 2 front brackets on the gimbal mounting plate with M3x5.5 screws. Connect the gimbal absorbing bracket and connectors. Pull the 3 rubber gimbal dampers though the holes on the connectors. Connect the gimbal flat cable to the flat cable port on the GCU. Connect the gimbal power cable to the DC-18V port on the PMU. Connect the video cable and attitude cable to the GCU. Mount the vibration absorbing bracket to the expansion tubes at the front of the aircraft. Secure the vibration absorbing bracket connectors with M3x8 screws. 3. Mounting the Zenmuse Z30. Remove the gimbal cap. Align the white dot on the Zenmuse Z30 with the red dot on the quick release port. Connect the Zenmuse Z30 to the quick release port. Rotate it until the red dot on the Zenmuse Z30 is aligned with the red dot on the quick release port. mounting is now complete.
Mounting the Zenmuse Z30 to the Matrice 600 Pro
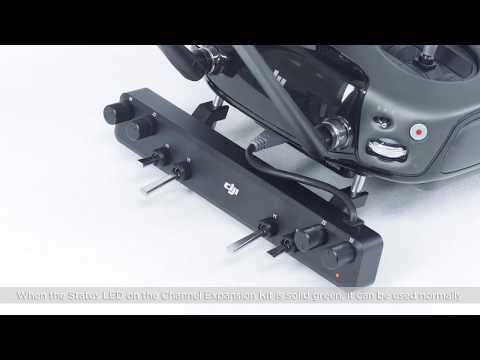
Matrice 600 mounting the remote controller channel expansion kit. The remote controller channel expansion kit is compatible with the Matrice 600 series remote controller which incudes 8 knobs or switches. Removing the interface module from the remote controller. Remove the 4 screws on the interface module with a 1.5mm hexagonal socket screwdriver. Remove the SDI port cover. Use the special wrench on the package to rotate the metal fixing rings on the SDI port counterclockwise. Remove the metal fixing ring and plastic fixing ring as shown. Remove the external shell of the interface module. Remove the 2 screws on the internal PCB board with a Phillips screwdriver. Unlock the black buckles for the 3 flat cables and remove the 3 flat cables gently. Remove the PCB board. Mounting a new interface module. Mount the new OCB board to the remote controller. Connect the 3 flat cables and lock the black buckles. Do not twit the cables. Tighten he 2 screws. Mount the external shell of the new module and tighten it with the 4 screws. Connect the CAN cable on the channel expansion kit to the CAN port. Mount the channel expansion kit to the remote controller handle as shown. Turn on the remote controller and wait a few seconds. When the status LED on the channel expansion kit is solid green it can be used normally.
DJI Matrice 600 - Mounting the Remote Controller Channel Expansion Kit
This video will show you how to upgrade the firmware on your Matrice 600 with the Zenmuse X5. When new firmware has been released on the official DJI website the DJI Go app will automatically prompt you to upgrade the firmware. Firmware updates enhance system, performance and introduce new functions. Matrice 600 and Zenmuse X5 must be upgraded separately. Upgrade Matrice 600 with DJI Assistant 2 and Zenmuse X5 firmware with a Micro SD card. 1. Upgrading the firmware on the Matrice 600. Visit www.dji.com/ and click flying platforms under industrial, click downloads. Under software download DJI Assistant 2, install DJI Assistant 2, start DJI Assistant 2. Power on the aircraft. Connect the LED port on the Matrice 600 to your computer with the USB cable. Matrice 600 and DJI Lightbridge 2 icons will be displayed on screen. Click Matrice 600 then click firmware upgrade. Choose the latest firmware version and click upgrade. Click start to upgrade and wait for the upgrade to complete. When the firmware has been upgrade successfully. Click unlock. Note that the unlock button is only displayed when main controller firmware needs to be upgraded. If the upgrade fails please try again following the steps in this video. If upgrading fails repeatedly please contact DJI after sales technical support. Check if nay settings have been changed after the upgrade. If so adjust the settings as needed. If multiple battery sets need to be upgraded please insert each set and perform the upgrade. The M600 upgrade is complete. You can upgrade Lightbridge 2 in a similar fashion. Click the DJI Lightbridge 2 icon. Choose the latest firmware and click upgrade. Click start to upgrade and wait for the upgrade to complete.
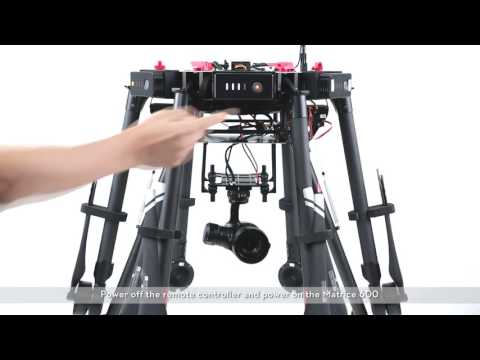
2. Upgrading the firmware on the Zenmuse X5. Under camera firmware download the camera firmware package to the computer. After decompression a .bin file will appear. Copy the .bin file into the root directory of the Micro SD card. Power on the Matrice 600 and insert the micro SD card into the camera. Power off the remote controller and power on the Matric 600. The firmware will upgrade automatically. During upgrading you’ll hear the following sound. This sound indicates the camera is detecting the upgrade file. This sound indicates the camera is upgrading. The sound indicate the upgrade is complete. A long beep indicates that the upgrade has failed. If the upgrade fails please format the micro SD card and copy the .bin file again following the steps in this video. Note that earlier versions of the X5 may fail to upgrade after power on. In this case please disconnect the CAN cable connecting the camera with the Matric 600 and try again. To check whether the camera has upgraded successfully remove the micro SD card and insert it to a card reader. Connect the card reader to your computer and find the .txt file. Open the file and check whether result success is displayed. If so the upgrade is complete and the camera is ready is use. Please delete the .bin file from the micro SD card after upgrading.
If result abort is displayed the camera has already been upgraded to the latest version and the camera is ready to use. If you find result corrupted the firmware upgrade package has been damaged. Please download another firmware upgrade package from the official DJI website. If you find result failed the upgrade has failed. Please format the micro SD card, copy the .bin file to the SD card, copy the .bin file to the SD card an try upgrading again following the steps in this video. If upgrading fails repeatedly please contact DJI after sales technical support. 3. Upgrading firmware on the remote controller. Power off the Matrice 600 before upgrading. Connect the remote controller with your mobile device and turn on the remote controller. Open the DJI Go app. Enter the camera screen, the aircraft status bar will prompt you to upgrade the remote controller. Connect your mobile device to the internet. Select download upgrade package. After the upgrade package has been downloaded select start to upgrade. During the upgrade you’ll hear the following sounds. If you hear this sound and the LED is solid blue the remote controller is begin upgraded. If you hear this sound and the LED turns green the upgrade is complete.
Note that after the remote controller has been upgraded successfully. A prompt saying RC upgrade complete will appear. The current firmware version and a prompt saying please reboot your RC will appear. If the upgrade fails please try again following the steps shown in this video. If upgrading fails repeatedly please contact DJI after sales technical support.
How to Upgrade Firmware on the Matrice 600 and Zenmuse X5
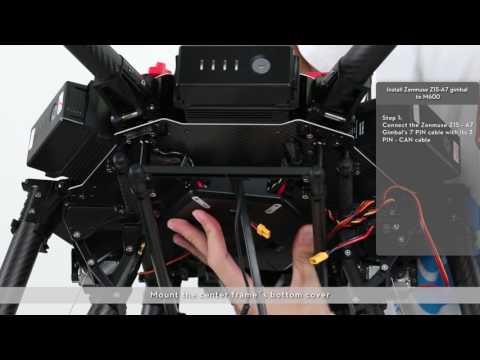
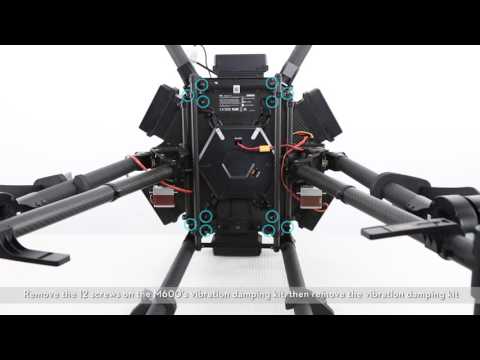
This video will show you how to install a Zenmuse Z15-A7 gimbal onto the M600. Remove the center frame’s top cover and do not damage the connecting cable of the fan. Disconnect the power cable from the landing gear and remove the center frame’s bottom cover. Pass the Z15-A7 gimbal pin cable through the hole on the aircraft body’s bottom board and connect it to light bridge 2’s gimbal cable port. Place the Z15-A7 gimbal’s CAN cable through the hole on the aircraft body’s bottom board and connect it to the CAN port on the A3’s GPS. Connect the fan’s power cable and mount the center frame’s top cover. Mount the center frame’s bottom cover. Attach the Zenmuse Z15 gimbal connector to the Zenmuse Z15 gimbal (M3x6.5). Mount the gimbal’s connector to the specific inner mounting position with the connector’s opening faces outwards. Replace the original Zenmuse Z15 vibration dampers with the vibration dampers in the M600-Z15 accessory kit. Cut even each side of the vibration dampers. Move the Zenmuse Z15 to the central position and fasten the M3x8 screws on the connectors. Connect the gimbal’s CAN cable and video cable to the Zenmuse gimbal’s GCU. Connect 1 of the parallel power cable’s XT60 sockets with the power management board’s XT30 power cable. Connect the landing gear’s power cable to the parallel power cable’s XT30 socket. Connect the Zenmuse Z15 gimbal’s GCU power cable to parallel power cable’s XT60 socket. Arrange the cables. Zenmuse Z15 gimbal installation is now completed.
Matrice 600 Tutorials - How to installing a Zenmuse Z15-A7 gimbal onto the M600

This video will show you how to install a Zenmuse X5 gimbal onto the M600. Remove the center frame’s top cover and do not damage the fan cable. Disconnect the power cable from the landing gear and remove the center frame’s bottom cover. Pass the Zenmuse X5 gimbal’s 7PIN cable through the hole on the aircraft body’s bottom board and connect it to Lightbridge 2’s gimbal cable port. Press the Zenmuse X5 gimbal 3PIN CAN cable through the hole on the aircraft body bottom board and connect it to the CAN port on the A3 GPS. Connect the fan’s power cable and mount the center frame top cover. Mount the center frame bottom cover. Use M3*6 screws to attach the expansion bay connectors to the expansion bays carbon board. Note there are 2 different types of expansion bay connector. Please distinguish between them during installation. The hole on the carbon board should point towards the nose. The fixed connectors should be mounted at the 2 positions near the nose and the moveable connectors should be mounted near the tail. Use M3*6 screws to attach the 4 gimbal connectors to the expansion bay carbon board. Please note that the gimbal connectors will tilt forward. Use 4 M2*5 cruciform screws to attach the gimbal mounting bar to the gimbal mounting board. Do not attach the gimbal mounting bar when installing an X3 or XT camera. Mount 1 gimbal mounting bar when installing the X5 camera. Mount 2 gimbal mounting bars when installing the X5R camera. Mount the gimbal quick release plate onto the gimbal mounting board and line up the 3PIN port and 7PIN port on the reserved hole of the gimbal mounting board. Attach the vibration dampers to the reserved holes on the gimbal connector. Then install the gimbal mounting plate onto the vibration dampers on the gimbal connector. Cut even each side of the vibration dampers. Remove the cross bar on the expansion tubes. Mount the expansion bay onto the expansion tubes. Use M3*8 screws to fasten the expansion bay connectors. Mount the Zenmuse X5 gimbals 7PIN and 3PIN cables to the gimbal buckle. Connect the landing gear power cable. Connect Zenmuse X5 gimbal power cable to the DC-18V port on the power management board. Mount the X5 camera on the gimbal quick release plate. Zenmuse X5 gimbal installation is now complete.
Matrice 600 Tutorials - How to install a Zenmuse X5 Gimbal onto the M600
