DJI Phantom 3
Videos on this page address functions of the Phantom 3 Standard, Phantom 3 SE, Phantom 3 Advanced, and Phantom 3 Pro. Read the icon labels carefully—not all procedures apply to all Phantom 3 models. “Upgrading the Aircraft Firmware on the Phantom 3” refers to the Advanced and Pro models. There’s also a firmware upgrade video for the Standard. Find other videos on linking remote controllers to the different models; connecting to and resetting the WiFi video downlink; using the remote controller; calibrating the remote controller and gimbal; and activating the Standard. Installation videos address propeller guards and an HDMI output module on the remote controller.
This video will show you how to activate your Phantom 3. Toggle the S1 switch to the upper most
position and ensure both control sticks are centered. Slide the power switch to the right to turn on the
remote controller. Press the power button on the aircraft battery once then press and hold it again for 2
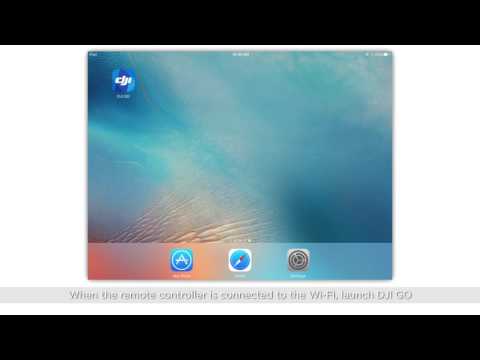
seconds to power on the aircraft. Go to your mobile device’s settings menu and select Wi-Fi. Select the
Phantom 3’s Wi-Fi network and enter the default password 12341234. If the password has changed
enter the new password. When the remote controller is connected to the Wi-Fi launch DJI Go. An
activation prompt will pop up. Tap next. Name your Phantom 3 Standard, you can change the name
later in the app if you so choose. Tap continue, then choose a stick mode. The default stick mode is
mode 2. You can set a customized mode under remote controller settings after activation. Tap continue
then select your desired measurement system and video standard. Tap continue. Next select whether or
not you’d like to use beginner mode. If this is your first time flying, practicing in beginner mode is highly
recommended. Confirm your account’s email address. Please note that the account you use to activate
your Phantom 3 Standard cannot be changed later. The aircraft’s information will be bound to your
account permanently. Your account will serve as proof of your warranty when you apply for service.
Disconnect your mobile device from the remote controller Wi-Fi network and connect to the internet.
Reenter DJI Go. Select activate and reconnect your mobile device to the remote controller Wi-Fi
network following the on screen instructions. Activation is now complete.
DJI Phantom 3 - Activating the Phantom 3 Standard
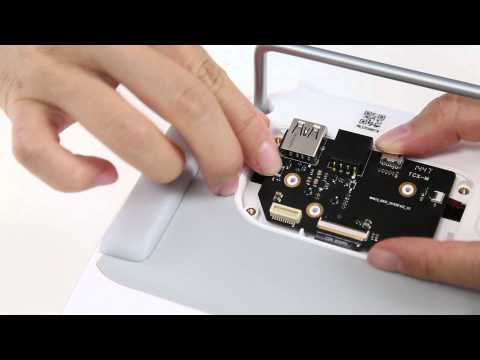
This video will show you how to install the HDMI output module on the Phantom 3 remote controller in
a few easy steps. Before we get started make sure that you have the following tools and parts: remote
controller, HDMI output module, plastic cover, 3 Phillips head screws, 4 hexagon screws, Philips
screwdriver 3mm, Rocket Screwdriver 1.5mm. To install the new HDMI module you first need to remove
the original module from your remote controller. Please follow the steps: confirm that the remote
controller is powered off. Turn the remote controller upside down to expose the cover. Unscrew the 4
hex screws. Remove the cover. Unscrew the 3 Philips screws. Unclip 2 small wire clips. Unclip 1 large
wire clip. Pull out 3 black cables. Remove the original module. Insert the new HDMI output module.
Reconnect the 3 black cables and make sure they are tightly fitted. Screw in 3 Phillips screws. Reattach
the white cover. Screw in 4 hexagon screws.
The first part of the installation is now complete. To confirm that the HDMI module has been
successfully installed. Do as follows: power on the remote controller. Press the C1 and C2 buttons. If the
C1 and C2 buttons beep while pressed the HMDI output module has been successfully installed. The
module has 4 ports, the first is the USB port, the second port is currently not in use and has no
functionality as of today, the third is the testing part and the fourth is the HDMI type C output port. The
resolution of the video output is 720p. The output frequency can be set in the DJI Go app based on your
location: 50HZ (PAL) in most parts of Europe China and the Middle East and 60HZ (NTSC) in North and
South America and Japan.
Phantom 3 Tutorials- How to install HDMI output module on Phantom 3 remote controller
This video will introduce the IMU module and show you how to calibrate the IMU. The IMU module is
the aircraft’s sensor and includes a barometer, gyroscope and accelerometer and helps keep the aircraft
steady while in air. The condition of the IMU is crucial for the safety of the aircraft. If you notice that the
camera is not level when mounted to the gimbal or if the DJI Go app displays a bias warning you can
correct this and resume normal operation by calibrating the IMU. How to check and calibrate the IMU.
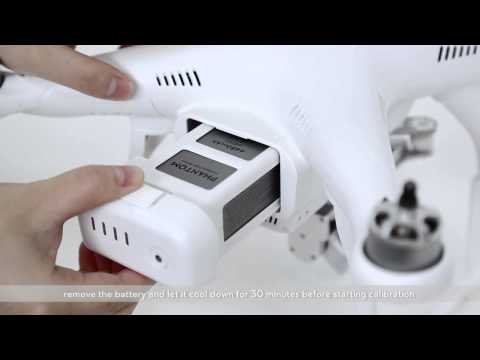
To prevent the aircraft from overheating during calibration first power off the aircraft remove the
battery and let it cool down for 30 minutes before starting calibration. Calibration should preferably be
done in doors at a room temperature of 20 degrees Celsius to 25 degrees Celsius. Before you begin
calibration make sure that that surface that you place the aircraft on is level. You can use the level
function on your smart phone to check this. Make sure the battery charge is at 50% or above to be able
to complete the full calibration process. Do not touch or move the aircraft while is it being calibrated.
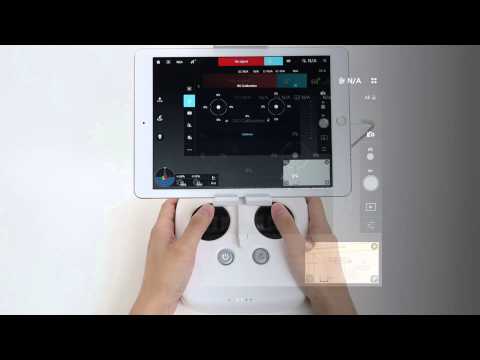
Calibration. Connect the remote controller and mobile device. Power on the remoter controlled and
then the aircraft. Launch the DJI Go app on your mobile device. Tap camera, tap setup in the top corner.
Tap sensor setting, find IMU and calibrate IMU. Check IMU first and see whether any error occurs. Then
tap calibrate IMU. Tap OK. Please wait while the IMU Is being calibrated. The app will notify you when
calibration has been completed. If the calibration fails repeat the above listed steps. If it fails several
times please contact DJI after sales support.
Phantom 3 Tutorials- IMU functions, calibration and precautions
This video will show you how to calibrate your remote controller. If your remote controller fails to
accurately control the aircraft or if the remote controller light turns red after linking to the aircraft and
the alarm is on continuously it may need to be calibrated. The steps to calibrate your remote controller
are as follows: power off the aircraft. Turn on the remote controller and launch the DJI Go app on your
mobile device. Tap camera. Tap the remote controller icon, choose RC calibration, tap calibrate. Move
the throttle stick according the instructions shown in the app. Repeat it several times and ensure that
the throttle stick can go through the maximum and minimum path. Turn the dial according to the
instructions given by the app. Repeat it several times. Tap finish. You have now finished calibrating your
remote controller. If the calibration fails repeat the listed steps above. If it fails several times please
contact DJI after sales service.
Phantom 3 Tutorials- Remote Controller Calibration
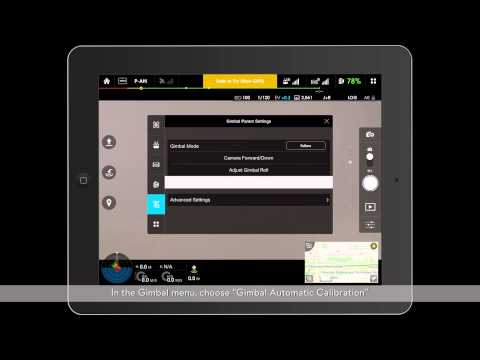
This video will briefly introduce gimbal auto calibration. If the gimbal is not level after calibrating the
IMU please continue with gimbal automatic calibration. The steps are as follows: make sure that the
aircraft is placed on level ground. You can use the level function on your smart phone to ensure that the
surface is level. Do not move it during calibration. Connect the remote controller and the mobile device.
Power on the remote controller and then the aircraft. Launch the DJI Go app on your mobile device. Tap
camera. Tap setup. Tap gimbal. In gimbal menu choose gimbal automatic calibration. Tap OK to start
calibration. Please wait while the gimbal is being calibrated. The app will notify you when the automatic
calibration has been completed. If the camera is still not level after performing the gimbal automatic
calibration please contact DJI after sales support.
Phantom 3 Tutorials- Gimbal Auto-Calibration
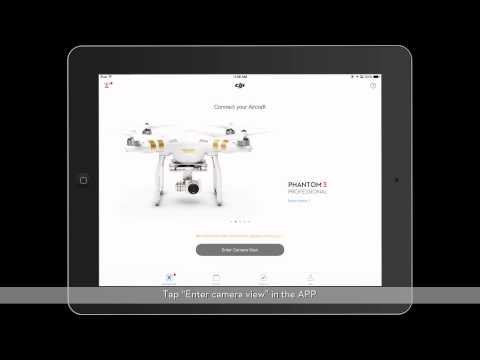
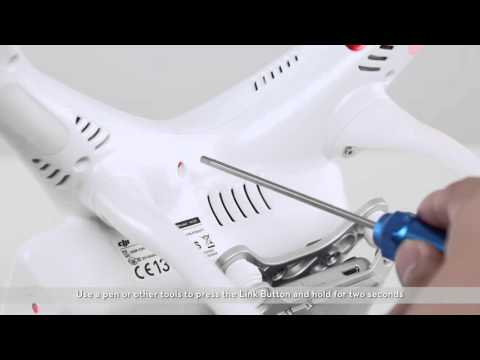
In this video we will introduce how to link the remote controller and the aircraft. When the rear light of
the aircraft flashes yellow fast and the RC light is solid red it indicates that the RC needs to be linked
with the aircraft. Steps of linking: Connect the mobile device to RC with data cable. Turn on the RC and
aircraft. Run the DJI Go app. Tap enter camera view in the app. Tap RC settings. Tap linking RC. Tap
confirm to link. The RC will emit beeping sounds. The RC light flashes blue and indicates the RC is in the
linking process. Face the left side of the aircraft. Find the second round hole on the vision positioning
module. Press the button with a pen/other tool for 2 seconds and release it. Eh beeping sound
disappears and the RC light turns green. App will show the linking has finished. Tap OK. If the linking fails
please relink the RC. If you have failed to link the RC many times please contact DJI technical support.
Phantom 3 Tutorials- Link the Remote Controller and the aircraft
In this video we will briefly introduce how to use the remote controller of the Phantom 3 Standard.
Toggle the on/off switch to the right side to turn on the RC. Hold the 2 ends of the RD with your hands.
Place your thumbs on the top of the sticks. Keep the antenna erect during the flight. Ensure the antenna
faces the aircraft with maximum receiving surface. Do not block the RC’s front end to ensure steady
signal transmission. Move both sticks to the bottom inner corners (CSC) to start the motors. Move the
left stick to the bottom and hold for 3 seconds to stop the motors. Beware that moving the left stick to
the bottom can stop the motors only when the aircraft is placed on the ground. When the aircraft is in
the air moving the left stick to the bottom will make the aircraft descend instead. If the sticks are moved
to the bottom inner corners when the aircraft is in the air the motors will stop rotating in the air. It can
force the aircraft to shut down in emergency. You are suggested to land the aircraft first and then move
the left stick to the bottom to stop the motors. The switch at the upper right corner of the RC can be
toggled to set the flight modes as P mode, A mode and F mode. P mode is most frequently used when
GPS is available. A mode is attitude mode and can be used when GPS is unavailable. F mode is function
mode and supports IOC functions.
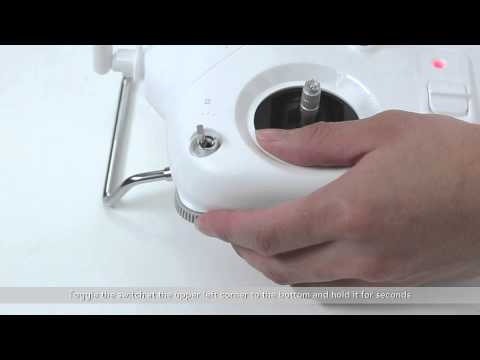
The switch at the upper left corner of the RC is used to link the RC, initiate RTH and reset Wi-Fi. How to
link the RC with the aircraft. Toggle the switch at the upper left corner to the bottom and hold it for
seconds. Then toggle the switch up and down quickly 3 times or more. The RC will blink and enter linking
status. Find the button at the bottom shell of the aircraft near the battery slot. Press the linking button
for about 2 seconds with pen or other tool and then release it. The linking is completed. How to
initiate/cancel the RTH mode. Quickly toggle the switch at the upper left up and down once to trigger
RTH mode. Toggle the right switch to trigger the flight mode and cancel RTH. You are suggested to
initiate/cancel the RTH mode in the app. Reset RC’s Wi-Fi. Toggle the switch at the upper left corner to
the top and hold it for 1 second. Then quickly toggle the switch up and down 3 or more times. RC
indicator light will flash green and red. The RC’s Wi-Fi password will be reset as 12341234 later.
Phantom 3 Tutorials- How to use the remote controller of Phantom 3 Standard
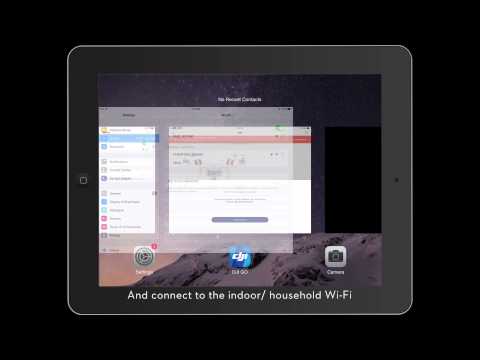
This video will introduce how to upgrade the firmware on the Phantom 3 Standard. Turn on the aircraft
and remote controller. Turn on Wi-Fi in your mobile device and check the wireless network list. Connect
to remote controller’s Wi-Fi. Enter the password 12341234. Run the DJI Go app. Check if the aircraft has
been successfully connected with the remote controller in the app initial interface. Tap update now on
the top of the screen. Disconnect the remote controller’s Wi-Fi and connect to the indoor/household
Wi-Fi. Tap to download the firmware in the app. Time used for downloading is subject to Wi-Fi speed.
Disconnect the indoor/household Wi-Fi after the firmware has been downloaded successfully. Download
it again if it fails. Connect to the remote controller’s Wi-Fi again. Tap to upgrade the firmware with the
aircraft connected to the RC. It will take 20 – 30 minutes to upgrade. A progress bar that shows the
upgrade status can be seen in the app. Do not turn off the aircraft during the upgrade. App will notify
whether upgrade is successful or not. If the upgrade fails please upgrade again. It is still can’t be
upgraded after trying several times connect the aircraft to PC and read the SD card. Find the hidden
folder in SD card click tool option, click folder option, click view option. Find the hidden folder and click
it. Click confirm to save the settings. Find the upgrade log file in the hidden folder. Contact DJI technical
support and send the log file to us for analysis.
Phantom 3 Tutorials- Upgrading the firmware on the Phantom 3 Standard
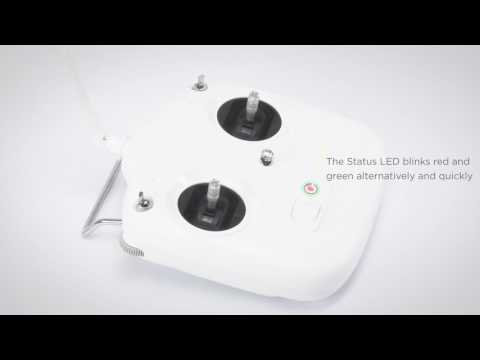
Phantom 3 Standard resetting the Wi-Fi video downlink. Turn on the remote controller. Turn the gimbal
dial to the far right. Toggle the S2 switch back and forth for at least 3 times. The status LED blinks red
and green alternatively and quickly. Restart the remote controller. After the Wi-Fi video downlink has
been reset SSID and password can be checked on the back of the remote controller.
DJI Quick Tips - Phantom 3 Standard - Resetting the Wi-Fi Video Downlink

Phantom 3 advanced professional linking the remote controller. Turn on the remote controller. Power
on the aircraft. Press the C1 button, C2 button and recording button at the same time. When the remote
controller starts beeping “D-D-D” toggle the camera settings dial for 2 seconds. The remote controller
makes a short beeping sound and the status LED blinks blue quickly. Press the linking button on the
aircraft with a needle. When the linking status indicator blinks red the remote controller is linking. When
linking is complete the linking status indicator is solid green. The status LED turns green and remote
controller stops making a beeping sound
DJI Quick Tips - Phantom 3 Advanced/Pro - Linking the Remote Controller

Phantom 3 linking the remote controller without DJI Go. Power on the remote controller and the
aircraft. Take the Phantom 3 Standard as an example. Press the link button with a needle tool. Hold it
for 2 seconds and then release. The link button will blink red. Turn the gimbal dial to the far left and
toggle the S2 switch back and forth for at least 3 times at the same time. The remote controller will
make a short beeping sound. When linking is complete the remote controller will stop beeping and the
link button will be solid green.
Quick Tips - Phantom 3 Standard/SE - Linking the Remote Controller without DJI GO
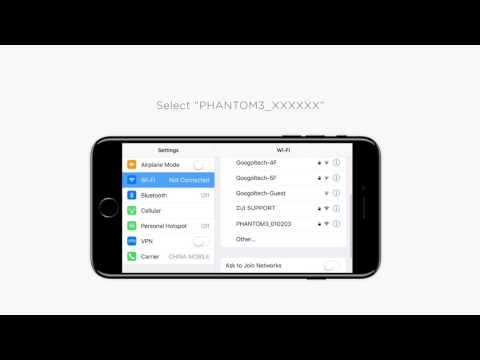
Phantom 3 connecting to the Wi-Fi video downlink. Power on the remote controller and the aircraft.
Take Phantom 3 Standard as an example. On your mobile phone enter the Wi-Fi network list. Select
Phantom3_XXXXXX. Enter the default password 12341234 printed on the sticker at the bottom of the
remote controller. Launch DJI Go and enter camera view. If there is image transmission the remote
controller is connected to the mobile device successfully.
DJI Quick Tips - Phantom 3 Standard/SE - Connecting to the Wi Fi Video Downlink
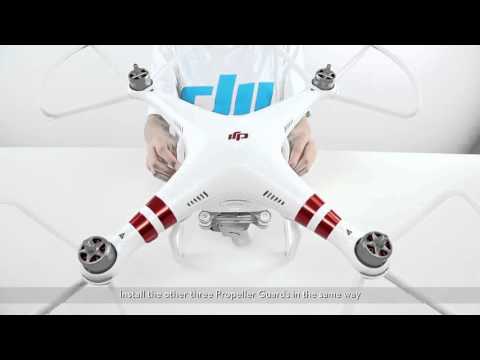
This video will show you how to install propeller guards on the Phantom 3 series. Before we get started
make sure you have the following tools and parts: a Phantom 3 aircraft, 4 propeller guards, white
protective wire, 8 M3*10mm screws, a hex key. Please use M3*10mm screws to install the propeller
guards. If you remove the propeller guards please re install the original M3*5mm screws. Otherwise the
motors may be damaged by the M3*10mm screws. To install the propeller guards please follow these
steps: unscrew the M3*5mm screws on the 4 arms using a hex key. Altogether you will remove 8
M3*5mm screws, 2 from each arm. Please take good care of the M3*5mm screws so that they can be
put back on when you want to take of the propeller guards. Place 1 propeller guard on each arm. Screw
in and tighten 2 M3*10 screws with the hex key. No thread lock should be used. Make sure the propeller
guard is installed correctly. Install the other 3 propeller guards in the same way. Install the 4 propellers
by screwing them on in the correct direction. Observe the gap between propellers and propeller guards.
Make sure the propeller guards and the propellers are functioning normally. Thread the protective wire
through the small hole on the edge of each propeller guard. Fix the wire on the prongs to keep the 4
propellers tightly fixed. Tie a knot at the end of the wire. The wire is used as a barrier to protect the
propeller damage. That’s how you install the propeller guards.
Phantom 3 Tutorials-How to install Propeller Guards on the DJI Phantom 3 Series
This video will show you how to upgrade the firmware on your Phantom 3 Professional and Advanced.
Please visit our official website www.dji.com click products, Phantom 3, Phantom 3 series, click
download. There are various versions of firmware for both Phantom 3 Professional and Phantom 3
Advanced. If you want to upgrade the professional version aircraft please download the professional
upgrade. If you want to upgrade the advanced version aircraft please download the advanced upgrade.
Download the package according to your requirements. Unzip the download package and archive a file
with the suffix BIN. Insert the SD card into the SD card slot of the gimbal. Connect the micro USB port of
the gimbal with your computer via the USB cable in the box. Launch the aircraft and copy the BIN file
used for upgrade into the root directory of your SD card. Caution: Another .bin file in the root directory
of your SD card may lead to upgrade failure. Please format the SD card by using the app before moving
the BIN file in. Remove the USB cable after you have copied the .bin file into your SD card. The aircraft
will upgrade automatically. Generally the upgrade process will be finished in 30 minutes.
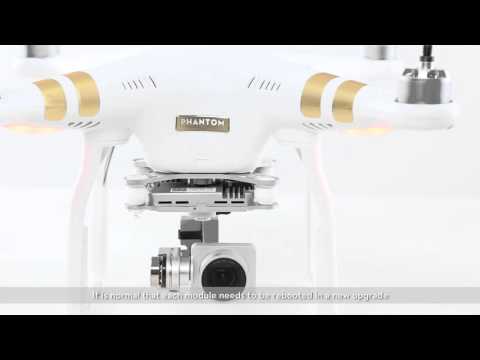
Caution: The following problems might occur during the upgrade process. 1. The gimbal becomes limp.
2. The aircraft indicators suddenly go out. 3. The aircraft reboots automatically. Please keep the aircraft
upgrading and do not turn it off if these exceptions occur. It is normal that each module needs to be
rebooted in a new upgrade. Please pay attention to the gimbal status indicators once the update begins.
The firmware is upgrading while the indicator flashes green and red alternatively. The upgrade is done if
the indicator turns solid green. The upgrade is unsuccessfully if the indicator turns solid red. The best
way to confirm the result of the upgrade is as follows: please connect the micro USB port of the gimbal
with your computer via the USB cable in the box. Check the automatically generated TXT file on the SD
card. Check if the upgrade result is success. The success result indicates a successful upgrade. An abort
result indicates the firmware was already upgraded to the latest version before your upgrade. A failed
result indicates the unsuccessful upgrade. Please repeat the upgrading process again. You just need to
reboot the aircraft to upgrade again. The aircraft may make loud warning sounds while upgrading if the
module is unsuccessfully upgraded. The loud warning sound can be ignored of the camera status
indicator flashed red and green alternatively which means the device is upgrading automatically. The
loud warning sound will be gone once the upgrading is successful. If you fail to upgrade the firmware
many times please contact DJI technical support.
Phantom 3 Tutorials- Upgrading the aircraft firmware on the Phantom 3
This video will show you how to link your Phantom 3 Standard and its remote controller. When the
indicator light at the rear of the aircraft flashes yellow quickly and the indicator light on the remote
controller is solid red you will need to link the remote controller with the aircraft. This video will show
you 2 methods to link the devices. Method 1. Power on the remote controller and the aircraft. Connect
your mobile device to the Wi-Fi network of the remote controller. Enter the password of the Wi-Fi
network, the default password is 12341234. Launch the DJI Go app. Enter the camera interface, select
RC settings, select linking RC, select OK. The remote controller will make a sound to indicate connection.
Turn the aircraft upside down. Find the hole near the aircraft’s landing gears, use a pen or other tool to
press and hold the link button for 2 seconds. The remote controller will stop making sounds and the
indicator light will turn solid green. Select OK when the app shows a notification indicating the RC linking
is successful. Method 2. Power on the remote controller and the aircraft. Press the link button, the
indicator light will blink red when the aircraft is red to link. Turn the gimbal dial to the far left and toggle
the S2 switch back and forth quickly at least 3 times. You will hear a beeping sound when the remote
controller is trying to link to the aircraft. The remote controller will stop making sound and the aircraft
will turn solid green if linking is successful. If linking fails on the first attempt please try again. If linking
fails repeatedly please contact DJI technical support.
Phantom 3 Tutorials -How to link the Phantom 3 Standard and Remote Controller

Gimbal Auto Calibration Phantom 3 SE. Place the aircraft on level ground. Power on the remote
controller. Power on the aircraft. Connect the mobile device to the remote controller’s Wi-Fi. Launch DJI
Go and tap camera. Tap the icon on the upper right corner to enter general settings and then gimbal
settings. Tap gimbal auto calibration. Tap OK after reading the tips. The aircraft will start calibrating the
gimbal automatically. Please wait until a gimbal calibrated notification is shown in the app. If your
gimbal is skewed after the IMU calibration and gimbal auto calibration after several attempts please go
to dji.com support and repair service and use the online repair request for sending your aircraft back for
diagnosis.
DJI Phantom 3 SE ? Gimbal Auto Calibration
Phantom 3 linking the remote controller with DJI Go. Power on the remote controller and the aircraft.
Take the Phantom 3 Standard as an example. Connect the mobile device to the remote controller’s Wi-Fi
network. Launch DJI Go. Enter camera view, go to remote controller settings. Click linking remote
controller. The remote controller will make a beeping sound indicating that it is ready to link. Press the
link button on the right side of the aircraft for 2 seconds and release. The remote controller will stop
beeping. The status LED on the remote controller turns green
Quick Tips - Phantom 3 Standard/SE - Linking the Remote Controller
