DJI Phantom 4 Pro
Videos on this page explain functions of the DJI Phantom 4, Phantom 4 Pro+ and Phantom 4 Advanced. Read each icon title carefully to see which Phantom 4 version is the subject. You’ll find basics, such as mounting propeller guards and the battery. You can also explore videos with critical flight information: activating the Phantom 4 Pro/Advanced, which begins your warranty, and linking the Phantom 4 Pro and Advanced with their remote controller. Separate videos demonstrate how to use DJI Go 4 to focus manually or automatically with the Phantom 4 Pro. Learn how to upgrade firmware.
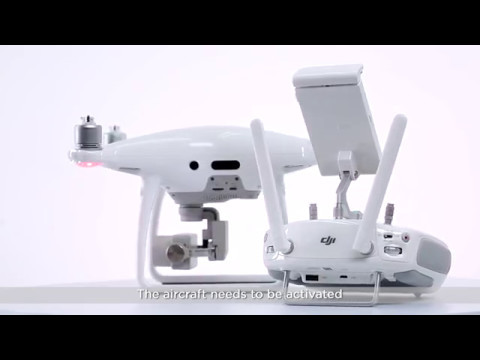
When you get a brand new Phantom 4 series aircraft the aircraft needs to be activated. This video will
show you how to activate your Phantom, 4 Pro. These steps also apply to the Phantom Pro Advanced.
Power on the remote controller and the Phantom 4 Pro. Connect the mobile and remote controller with
a USB cable. Ensure that your mobile device is connected to the internet. Launch DJI Go 4 and an
activation prompt will pop up. You’ll need to activate your Phantom 4 Pro when connecting with DJI Go
4 for the first time. Activation will mark the beginning of your 1 year warranty. Tap next and name your
Phantom 4 Pro. You can change the name later in the app if you so choose. Tap continue. Then choose a
stick mode, the default stick mode is mode 2. You can see a customized mode under remote controller
settings after activation. Tap continue. Then select your desired measurement system and video
standard. Tap continue to enter beginner mode settings, the aircraft is set to beginner mode by default.
In beginner mode the aircraft wont takeoff with a GPS signal and fight altitude and distance will be
limited to 98 feet or 30m. Also the infrared sensing system is enabled in beginner mode. Tap continue to
continue to confirm your account’s email address. Please note that the account that you use to activate
your Phantom 4 Pro cannot be changed later. The aircraft’s information will be bound to your account
permanently and your account will serve as proof of warranty when you apply for service. Tap activate.
After your Phantom 4 Pro is activated successfully feel free to check out tutorials for beginners in the
app and practice flying safely
DJI Phantom 4 Pro/Advanced - Activating the Phantom 4 Pro
All Phantom 4 series remote controller are linked to the aircraft before delivery. But if the aircraft status
indicator blinks yellow quickly and the status LED on the remote controller is solid red the remote
controller needs to be linked with the aircraft. This video will show you how to link your Phantom 4 Pro
with its remote controller. These step also apply to the Phantom 4 Advanced. There are 2 ways to link
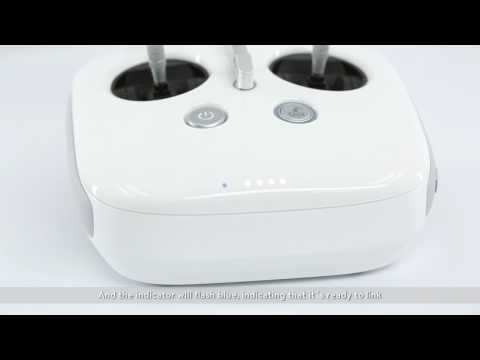
the Phantom 4 Pro. Here’s how to link your RC with DJI Go 4. Launch DJI Go 4. Select remote controller
settings, press linking remote controller and tap OK. The remote controller will emit a beeping sound
“DD” and the indicator will flash blue indicating that it’s ready to link. To the right of the aircraft nose
find the hole between the SD slot and the USB port. Press the button with a pen or suitable tool, hold
for 2 seconds and release it. Beeping will stop and the remote controller indicator will turn green. The
app will display a notification indicating linking is complete. Tap OK. Linking without a mobile device.
Power on the aircraft and remote controller. Then press the C1, C2 and record button at the same time.
When the remote controller starts beeping press the link button on the aircraft. Of linking fails please try
again. If linking fails repeatedly please contact DJI support.
DJI Phantom 4 Pro/Advanced Linking the Aircraft and the Remote Controller

DJI Phantom 4 Pro/Advanced - Upgrading Firmware (Assistant 2)
DJI Phantom 4 Pro/Advanced - Upgrading Firmware (Assistant 2)
Upgrading with DJI Go 4. Power on the remote controller and the aircraft. Connect 1 side of the OTG
cable to the Micro USB port on the aircraft and connect the other side to your mobile device. Please
make sure that your mobile device is connected to a mobile or Wi-Fi network. Launch DJI Go 4. When a
firmware upgrade is available a notification will be displayed in the app. Select the notification and a
download menu will pop up. Tap download now. The app will start downloading the firmware package.
When downloading is complete the app will prompt that the aircraft should be connected. After the
aircraft is connected tap start update. The gimbal will be powerless during upgrading and it’s normal for
the aircraft to power off automatically. Do not turn off the aircraft, turn off the app, unplug any cables
or turn off the remote controller. It will take about 15 minutes to upgrade the firmware. When finished
the app will display a notification indicating the update is complete. If you have multiple Phantom 4 Pro
intelligent batteries insert each additional battery and perform the preceding steps to upgrade. If the
upgrade fails reboot the aircraft and try again. If upgrading fails repeatedly please contact DJI support
DJI Phantom 4 Pro/Advanced - Upgrading Firmware (DJI GO 4)
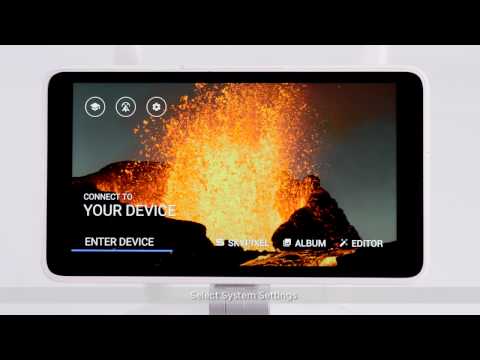
This video will show you how to upgrade the firmware on your Phantom 4 Pro Plus’ remote controller with a Micro SD card. Visit the Phantom 4 Pro page on the official DJI website and download the latest Phantom 4 Pro remote controller firmware package. Copy the extracted bin file (GL300E_RC_xxxbin) to the root directory of the Micro SD card. Insert the SD card into the SD card slot on the Phantom 4 Pro remote controller. Turn on the remote controller, select system settings, about device and then system updates. Tap local update in the top right corner. The version of the firmware on the SD card will be displayed. Tap update to start updating. After updating the remote controller will restart automatically and install the update. Please wait patiently until installation is complete. Do not turn off the remote controller or remove the Micro SD card during installation
DJI Phantom 4 Pro+ Upgrading RC Firmware Micro SD Card
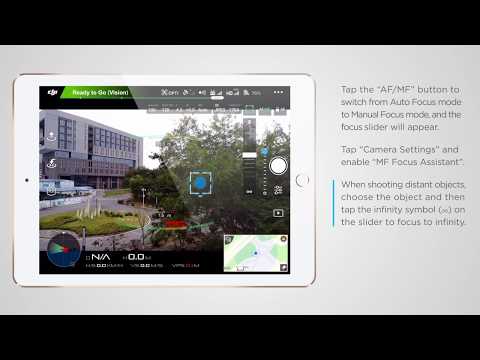
Phantom 4 Pro. Using DJI Go 4 to focus manually. Tap AF/MF button to switch from auto focus to manual focus mode and the focus slider will appear. Tap camera settings and enable MF focus assistant. When shooting distant objects choose the object and then tap the infinity symbol on the slider to focus to infinity. Or tap somewhere you want to focus and move the slider to focus manually.
Phantom 4 Pro - Using DJI GO 4 to Focus Automatically
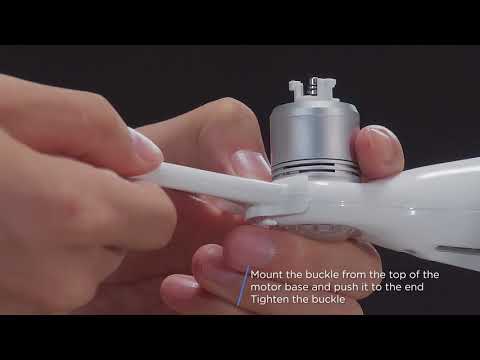
Phantom 4 series, mounting propeller guards. Remove the 4 transparent protective covers on the arms
and store them properly. Pay attention to the installation directions. Otherwise it may affect the
forward vision and rearward vision system. Mount the buckle from the top of the motor base and push
it to the end. Tighten the buckle. Perform the same steps to mount the other propeller guards.
DJI Phantom 4 Series Mounting Propeller Guards
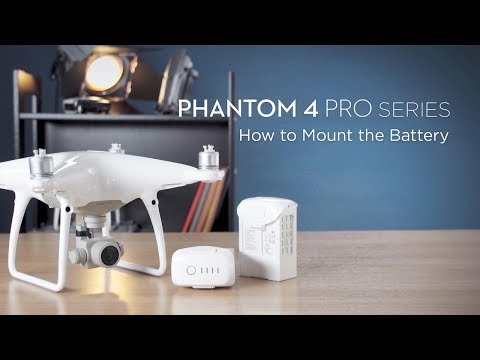
Push the battery into the battery compartment. Hold both sides of the arm with your hands and press
and holds the middle upper part of the battery as shown. Push the battery diagonally downward until a
click is heard indicating the battery has been mounted in place. Note: if the battery has been mounted
correctly and no warnings are shown in the app do not shake the battery. If a warning is shown remove
and install the battery again.
DJI Phantom 4 Series How to Mount the Battery
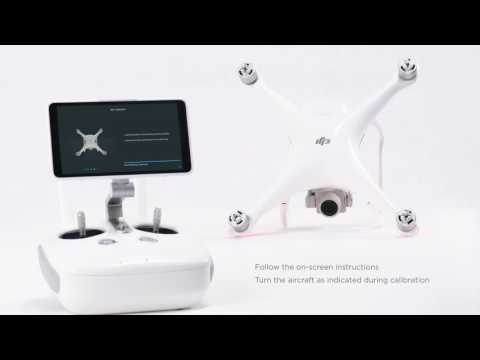
Phantom 4 Pro/Pro IMU Calibration. Enter camera view and tap general settings on the upper right corner. Go to MC settings, tap advanced settings, sensors state and IMU calibration. Tap start. Follow on screen instruction. Turn the aircraft as indicated during calibration
DJI Quick Tips - Phantom 4 Pro - IMU Calibration
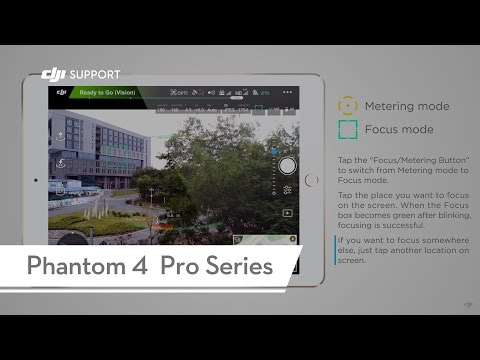
Phantom 4 Pro using DHI Go 4 to focus automatically. Metering mode. Focus mode. Tap the focus/metering mode to switch from metering mode to focus mode. Tap the place where you want to focus on the screen. When the focus box becomes green after blinking focusing is successful. If you want to focus somewhere else just tap another location on screen.
Phantom 4 Pro - Using DJI GO 4 to Focus Manually
