DJI Matrice 200
An industrial-level quadcopter with the option of dual camera mounting, the Matrice 200 can be highly customized by users, depending on their needs. Because of that, videos go into considerable detail. Separate installation videos focus on mounting an upward gimbal, a dual downward gimbal, and the Zenmuse XT thermal camera with adaptive ring. Firmware upgrade videos demonstrate aircraft operations, the remote controller, and the XT2 thermal camera. Explore use of the RTK positioning tool, and observe how to link the remote controller and aircraft. There’s also a video demonstration of the FlightHub management tool and another on the MSX management program for the XT2 thermal camera.
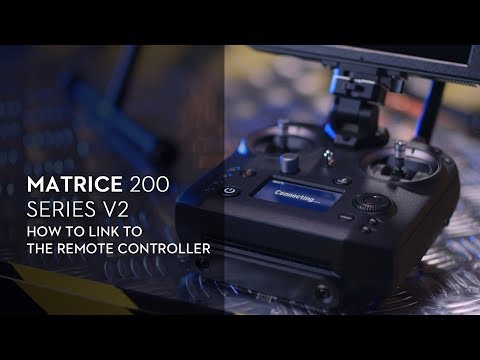
If a “No Connection” prompt appears on the remote controller’s screen, and the aircraft’s rear indicators flash yellow quickly, then the remote controller needs to be linked with the aircraft.
Linking via DJI Pilot: Launch DJI Pilot and enter the Manual Flight Mode. Tap the remote controller icon on the top menu bar, then enter the remote controller’s settings page. Tap “Remote Controller Linking”. After confirming, the remote controller’s screen will prompt a “Connecting…” notification and make beeping sounds, indicating that the remote controller is ready to be linked.
The remote controller will be ready to be link for 60 seconds. Open the port cover on the rear of the aircraft and press the Linking button. Then the Linking button’s indicator will flash red and green alternatively. When the indicator glows solid green, the linking is successful. Now you can check the flight parameters on the remote controller’s screen.
Linking via the remote controller buttons: Press the remote controller’s C1, C2, and Record button simultaneously, then the remote controller will enter the linking state. When the remote controller makes beeping sounds, press the Linking button on the rear of the aircraft. Wait until the linking is finished. If the linking fails, please check if the remote controller's and aircraft's firmware has been updated to the latest version.
Hit the like button, if this tutorial was helpful. If you need any support with your DJI gear, feel free to contact us via Facebook messenger, by following the link in the description. Thank you for watching.
Matrice 200 Series V2 - How to Link the Remote Controller to the Aircraft
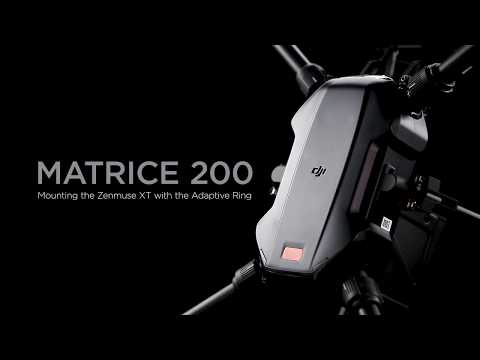
Matrice 200, mounting the Zenmuse XT with the adaptive ring. Align the wide slot on the adaptive ring with the red dot on the gimbal mount as shown. Rotate the adaptive ring to the right to lock it in place. Ensure that the adaptive ring has been mounted properly. Align the white line on the gimbal with the white line on the adaptive ring and mount the gimbal as shown. Rotate the adaptive ring to the left to lock it in place. Ensure that the gimbal has been mounted properly
DJI Quick Tips - Matrice 200 - Mounting the Zenmuse XT with the Adaptive Ring

DJI flight hub is a software platform that provides users with the flight date records and rapidly allows users to assess their aircraft’s operations on map from anywhere to coordinate missions. On the live view screen you can view real time video feeds. Up to 4 aircraft video streams can be viewed at the same time even if you are 1000m away. On the flight data screen you can view flight records, replay flight routes and check the total time in the air helping you to improve the management of operations and device maintenance. On the management screen you can split up your teams and assign them different permissions. Also you can manage all your drone equipment in 1 place. Flight hub is an ultimate solution that will help you to increase team efficiency and communication by organizing your teams and records around projects. After flight hub is purchased visit www.dji-flighhub.com and use the activation code to activate your flight hub account. After activation add team members on the management screen and set your team members’ permissions. Captains have permission to access the DJI flight hub platform and manage pilots and devices. After receiving the information pilots can log into the email and click the confirm link to join the team. After confirmation pilots can log into the DJI Pilot app with their DJI account tap connect to flight hub in the DJI Pilot app. Tap bind device to my team to ass the device to your team. The pilot can enable the live view under the live video settings and check the image transmissions in real time. With its easy access and functionality DJI flight hub is the ultimate enterprise drone management solution
FlightHub - Introduction and Demonstration
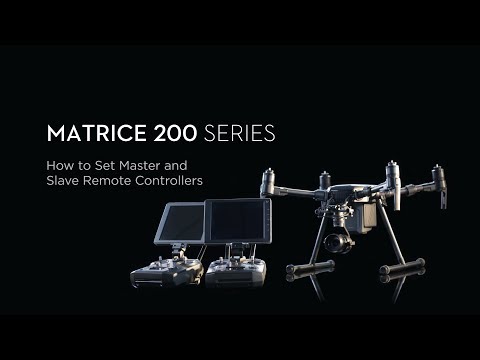
The Matrice 200 series drones support DJI’s standard remote controller and Cendence. When setting the master and salve remote controllers you can use either type of these 2 remote controllers interchangeably. Let’s use 2 Cendence remote controllers as an example. Connect the master remote controller and salve remote controller to their respective mobile devices. Power on the remote controller and drone. Launch DJI Pilot (DJI GO 4) on the mobile device connected to the master remote controller. Tap manual flight. Tap remote controller settings. Select master beside master and salve. Note down the master remote controller’s ID and authorization code. Launch DJI Pilot (DJI Go 4) on the mobile device connected to the salve remote controller. Tap manual flight, tap remote controller settings. . Select slave beside master and salve. Tap search master. Select the remote controller in the master list. Enter the master controller’s authorization code and connect the salve remote controller to it. If the slave remote controller needs to control the gimbal tap request gimbal control. Move the slave’s control sticks to check whether the gimbal can be controlled.
Matrice 200 Series - How to Set Master and Slave Remote Controllers
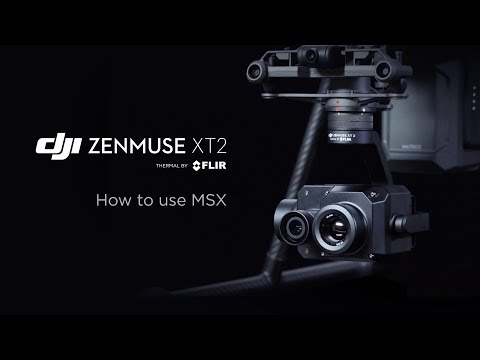
Power on the remote controller and the aircraft. Launch the DJI Pilot app. Enter the video downlink interface. Tap the wrench icon at the top right corner. Choose the MSX level to achieve different display effects. The MSX offset can be adjusted by using the plus and minus icons to enable the MSX profile perfectly superpose with the target object. If you have any questions contact DJI support.
DJI Zenmuse XT 2 - How to use MSX
Before the update go to the enterprise page on DJI’s official website. Click Zenmuse XT2 and download the latest firmware under downloads. Copy and paste the firmware’s .bin file to the root directory of an SD card. Insert the SD card into the Zenmuse XT2 and mount the Zenmuse XT2 to the drone. Then power on the drone. After the gimbal is powered on and starts the self-check the firmware update will automatically start and the Zenmuse XT will begin to make beeping sounds. Note: Do not power off the drone or remove the gimbal during the update as the camera may be damaged. After the update you can export the log file from the SD card to check the update record. Open the log file and check the word beside result to view the update’s result. If you have any questions contact DJI support.
Zenmuse XT2 | Updating the Firmware
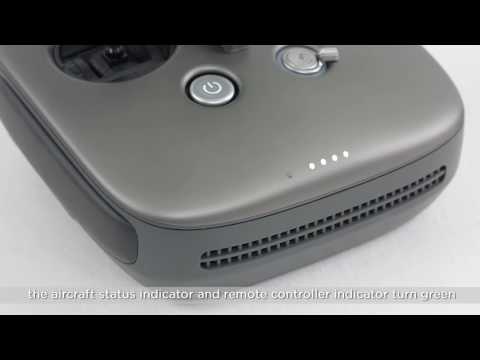
All Matrice 200 remote controllers are linked to the aircraft before delivery. But if the aircraft status indicators flash yellow quickly and the indicator on the remote controller is solid red then the remote controller needs to be linked with the aircraft. There are 2 ways to link the Matrice 200 to a remote controller. 1. Linking the remote controller with DJI Go 4. Connect the remote controller to the mobile device. Power on the remote controller and the aircraft. Launch DJI Go 4. Tap the RC icon at the top of the screen and enter remote controller settings. Then select linking remote controller and tap OK in the link RC prompt. The remote controller will beep “DD” and the indicator will flash blue indicating the remote controller is ready to be linked. The remote controller will be primed to link for 60 seconds. Open the port cover at the rear of the aircraft and press the linking button. The button is also the linking status indicator. Then the linking status indicator will flash red quickly. The linking is complete when both the aircraft and the controller indicator turn green. 2. Linking remote controller without a mobile device. Power on the aircraft and remote controller. Then press the C1 button, C2 button and the record button at the same time. When the remote controller starts beeping press the linking button on the aircraft. Ensure that the firmware of the aircraft and remote controller are updated to the latest version. Check the remote controller settings before the update. If the remote controller is in slave mode then the linking will not work. Please set the remote controller to master mode.
DJI Matrice 200 - Linking the Aircraft and the Remote Controller
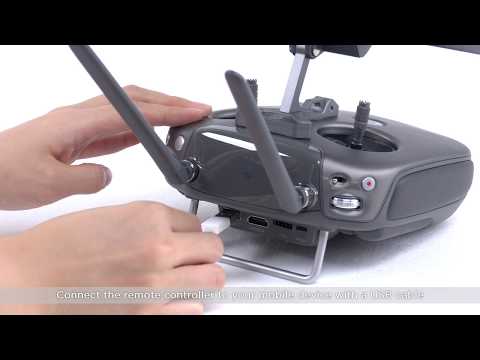
This video will show you how to update the Matrice 200 series remote controller firmware. Connect the remote controller to your mobile device with a USB cable. Power on the remote controller and ensure that the remote controller’s battery is fully charged. Connect your mobile device to a mobile or wireless network. Launch DJI Go 4. When the remote controller firmware is required to be updated a notification will be displayed in the app. Tap update now on the main screen. When downloading is complete it will start updating. The app will display the app’s update progress and make a beeping sound. Once updates restart the remote controller. If the update fails try updating again. If the upgrade fails repeatedly please contact DJI support
DJI Matrice 200 Series - Updating the Remote Controller Firmware
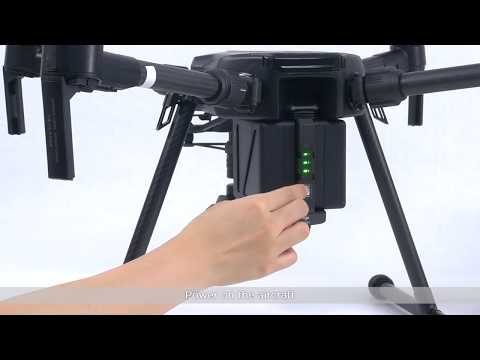
This video will show you how to update the firmware for your Matric 200 series aircraft. There are 2 ways to update the firmware. 1. Updating with DJI Go 4. It is recommended to fully charge the aircraft’s battery and remove the propellers before the update. Power on the aircraft. Open the port cover at the rear of the aircraft. Toggle the USB mode switch to the right and connect your mobile device to the aircraft with a USB cable. After your mobile device is connected a firmware update notification will be displayed in the app. Tap update now. When downloading is complete it will start updating. The aircraft will beep and the app will display the update’s progress. Once updated the aircraft will automatically restart. If multiple batteries or the gimbal and camera need to be updated please mount them to the aircraft separately and perform the update again. 2. Updating with DJI Assistant 2. Power on the aircraft. Open the port cover at the rear of the aircraft. Toggle the USB mode switch to the left. Connect the aircraft to your PC or Mac with the dual USB cable. Launch DJI Assistant 2. Enter your account and password to log in. click the M200 series icon to enter the home screen. Enter the firmware update screen. Select the newest firmware version and click update. When downloading is complete the firmware will automatically start to update. Once updated the aircraft will automatically restart. If the update fails ty updating again. If the update fails repeatedly please contact DJI support.
DJI Matrice 200 Series - Updating the Aircraft Firmware
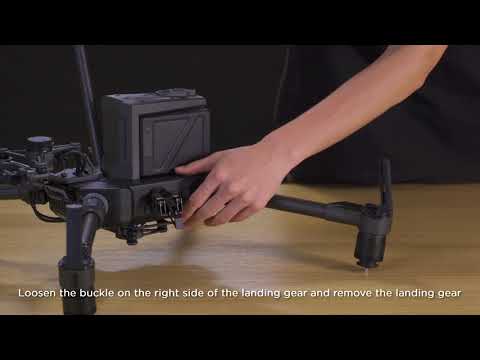
The Matrice 210 is an image platform that adapts to your needs. The video will show you how to update the upward gimbal. 1. Mounting the upward gimbal kit. Align the 4 screw holes on the upward gimbal kit with the screw holes on the upper aircraft shell. Note: The red dot on the port need to point in the direction of the aircraft’s nose. Tighten the 4 screws. Fix the cable buckle on the side of the aircraft with the 3M glue as shown. 2. Mounting the adaptive ring. Align the red slot on the adaptive ring with the red slot on the original mount and push the adaptive ring up as shown. Rotate the adaptive ring to the right to lock it in place. Ensure that the adaptive ring has been mounted properly. 3. Mounting the external GPS. Loosen the buckle on the right side of the landing gear and remove the landing gear. Remove the 3 screws on the landing gear base and remove the base. Mount the external GPS and tighten it with the 3 screws. Mount the landing gear and fasten the buckle. Open the port cover at the rear of the aircraft and connect the CAN cable to the expansion port. Ensure that the plug with the arrow faces upwards. 4. Mounting the upward gimbal and camera. Take the Zenmuse X5S as an example. Align the white dot on the Zenmuse X5S with the red dot on the gimbal mount. Push down the gimbal as shown. Rotate the gimbal and camera to the left to lock it in place. Ensure that the red dot on the Zenmuse X5S is aligned with the red dot on the gimbal mount
DJI Matrice 210 - Mounting the Upward Gimbal
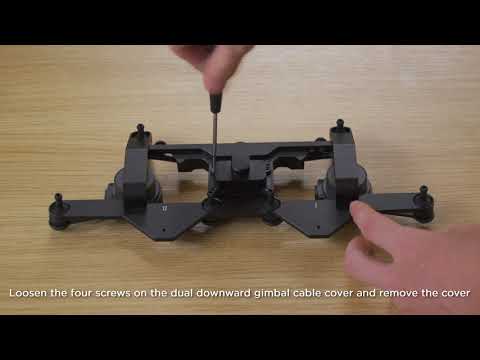
The Matrice 210 is an image platform that adapts to your needs. This video will show you how to mount the dual the dual downward gimbal. 1. Remove the downward gimbal mounting bracket. Loosen the screw as shown. Remove the 3 gimbal rubber dampers. Remove the water proof rubber ring. Remove the 3 screws on the cable cover. Loosen the 2 screws on the mounting piece and remove the mounting piece. Disconnect the camera coaxial cable and gimbal control cable. Remove the camera coaxial cable and gimbal control cable from the cable cover. Remove the gimbal dampening bracket. Keep the components that haven been removed. They can be used for installing a single gimbal. 2. Mounting the dual gimbal mounting bracket. Loosen the 4 screws on the dual downward gimbal cable cover and remove the cover. Loosen the 2 screws on the mounting piece and remove it. Pass the camera coaxial cable and gimbal cable through the cable cover. Connect the camera coaxial cable. Mount the mounting piece, tighten it with the 2 screws. Note: Make the mounting piece with the slot face upwards as shown. Connect the gimbal control cable. Tighten the cable cover with 4 screws. Mount the waterproof rubber ring. Mount the dual gimbal module to the aircraft, align the screw holes, mount the gasket and tighten the screw. Perform the same steps to mount the other gaskets and screws. Note that the Zenmuse X4S and Zenmuse X5S can only be mounted to the gimbal port 1.
DJI Matrice 210 - Mounting the Dual Downward Gimbal
Before using the Matrice 210 TRK’s ensure that the drone has been activated successfully. Toggle the USB switch at the rear of the drone to the RTK position. Connect the drone to the PC with a dual ended USB a cable. Launch DJI Assistant 2. Then a “D-RTK” icon will be displayed in DJI Assistant 2. Click the icon and activate the D-RTK air system. After the air system is activated connect the D-RTK ground system to the PC with the Micro USB cable. Then activate the ground system with DJI Assistant 2. Connect the datalink pro’s air system and ground system to the PC with the Micro USB cable respectively. Toggle the switch on the datalink pro to the combo position. Launch DJI Assistant 2. Go the firmware update screen. Update the datalink pro air system’s and ground system’s firmware to the latest versions. Enter the run mode screen. Set the datalink pro air system and ground system to full duplex mode or broadcast mode. After the activation and setting place the Matrice 210 RTK and ground system in an open environment without any interference. Connect the datalink pro air system to the remote controller and datalink pro ground system to the D-RTK ground system. Mount the D-RTK ground system to the tripod as shown. Power on the drone remote controller and D-RTK ground system. Toggle the switch on the datalink pro air system to the CAN position and the switch on the datalink pro ground system to the UART position. Press the link button on the datalink pro air system and ground system. When the LED on the air system and ground system is solid green (full duplex mode) or blue (broadcast mode) the linking is successful. If the aircraft status indicators blink blue and green alternatively and the LED on the D-RTK ground system is solid green the RTK’s signal is normal. Launch DJI Pilot, tap the satellite signal icon to check the RTK’s satellite status. When the indicator beside the orientation and positioning mode under the RTK satellite status lights up and ready to go GPS is shown the D-RTK is ready to be used and can perform the flight missions.
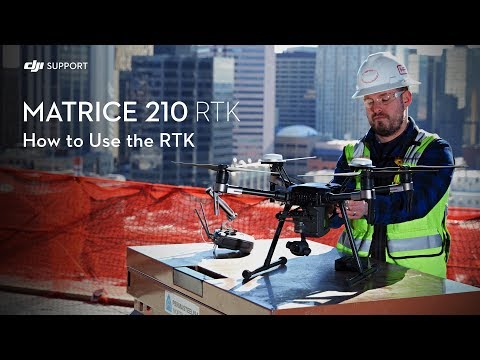
DJI Matrice 210 RTK - How to Use the RTK?
If you are using the Matrice 200 for the first time then you will need to activate your aircraft. Connect your mobile device to the remote controller with the USB cable. Power on the remote controller and aircraft. Ensure that your mobile device is connected to the internet. You will need to activate your aircraft when connecting to DJI Go 4 for the first time. Tap next and name your Matrice 200. Tap continue and set a control mode. The default stick mode is mode 2. You can set a customized mode under remote controller settings after activation. Tap continue and select you preferred unit and video output standard. Tap continue to log into your DJI account. Please note that the account you use to activate your aircraft cannot be changed after activation. The aircraft’s information will be bound to your account permanently. Your account will serve as proof of your warranty when you apply for services. Tap activate. After your aircraft has been activates successfully if a new firmware is available a new firmware update is available notification will be shown on the DJI Go 4 app. Tap the notification to enter the firmware update screen.
DJI Matrice 200 - Activating the Aircraft
