DJI Mavic 2
It may look like the original Mavic, but the Mavic 2 has far more capabilities, and these short videos explore many. Start with the basics by clicking videos on how to calibrate the IMU, activate the Mavic 2, prepare for and complete your first flight, and link the remote controller. Learn about the improved Point of Interest 2.0. Move on to videos explaining new features, including hyperlapse—it’s a time-lapse shot by a moving aircraft—and the omnidirectional vision system. Get instructions on updating firmware with DJI Assistant 2 or DJI Go 4.
Mavic 2 Series Tutorial - How to use the Mavic 2’s Hyperlapse Mode
Mavic 2 Series Tutorial - How to use the Mavic 2’s Hyperlapse Mode
Before calibration please do the following: install the latest version of DJI Go 4. Ensure the aircraft’s battery level is higher than 50%. Turn on the remote controller and connect it with the mobile device. Place the Mavic 2 on a level surface with its arms folded. Turn on the drone. Launch DJI Go 4. When the aircraft connects to the app go to the following menu in the app: settings, flight controller settings, advanced settings, sensors, tap calibrate IMU. Position the aircraft following the instructions in DJI Go 4 during the calibration process. Calibrating the IMU requires turning the Mavic 2 5 times following the sequence. Please do not try to start the motor during calibration. The IMU calibration will fail if the aircraft is not positioned following the instruction in DJI Go 4. After the calibration is complete IMU calibration complete will pop up in DJI Go 4.
Mavic 2 Series Tutorial - How to Calibrate the IMU
With a Mavic 2’s new point of internet 2.0 mode shooting POI becomes much easier. Using the vision system to set a point of interest. Open the intelligent flight mode menu and select point of interest. Choose the subject on the screen. Tap go and the drone will measure a radius centered on the target point. You can adjust the drone’s route and orientation in the app or with the control stick when the aircraft is orbiting the subject. If the gimbal drifts away from the target tap towards POI in the app and Mavis 2 will automatically adjust its direction and face towards the point of interest again. Using the GPS signal to set a point of interest. First hover the Mavic 2 above the point of interest. Press the C1 button on the remote controller to set the point of interest. Push the left stick to control the altitude. Push the right stick to control the orbit’s radius. After the aircraft is in the right position click go and the drone will orbit the subject. With the Mavic 2 is it easy to master 360 degree aerial photography
Mavic 2 Series Point of Interest 2.0 Tutorial
Download the DJI Go 4 app in the app store or Google play on your mobile device. Unfold the remote controller’s clamps and attach the RC sticks. Unfold the remote controller’s antennas. The cable on the left side of the remote controller can connect the phone with the remote controller. After the controller is connected to the phone and the mobile device is clamped to the remote controller unfold the aircraft’s arms. Press and hold the power button for 2 seconds to turn on the remote controller and the aircraft. Place the aircraft on level ground. Launch the DJI Go 4 app on the phone. Choose Mavic 2 on the home screen. The flight status bar on top of the screen shows the aircraft’s and sensor’s current working conditions. Once the app shows ready to pus both sticks to the bottom inner corners to the start motors. Then push the left stick up to take off. You can also press the auto takeoff icon on the left of the app to get airborne. Taking controller stick mode 2 as an example. The left stick controls the aircraft’s altitude and nose direction. While the right stick controls its forward and backward and left and right movements.
Click the top right corner on the app to enter the remote controller menu and change the stick mode. If the aircraft flies too far you can check the current aircraft position on the map in the bottom left corner. Press the flight pause button on the remote controller for emergency braking and hovering. There are many intelligent features built in the intelligent flight menu on the left side of the menu which greatly simplifies flight operations. APAS allows avoiding obstacles automatically (only when flying forward and backward) and greatly improves flight safety. Tap return to home or press and hold the smart RTH button on the remote controller to send the aircraft back to the takeoff spot. The function buttons on the right side of the app are: current camera parameters, settings, menu to adjust shooting settings such as exposure shooting mode, also a slide bar that shows gimbal tilt and the playback button.
You can also record your flight and capture stunning moments by the shortcut buttons on the remote controller. For example the gimbal dial controls the camera’s tilt. Shutter button: click it to snap a photo. Record button: Press it to start or stop recording video. To land the aircraft pull down the left stick until you touch the ground. You can also click the auto landing button in the app and let the drone do the rest of the job.
Mavic 2 Series Tutorial - First Flight

Connect the battery to the charger. Awaken and fully charge the battery. Ensure your mobile device is connected to the internet. Connect the mobile device to the remote controller. Turn on the remote controller and the drone. Click next in the popup window in DJI Go 4. Name your aircraft. Setup your joystick mode, the default mode is mode 2. Customize your remote controller’s buttons for convenient flying. Here’s an overview of the remote controller’s LCD screen interface. Choose your measurement units. It is advised to turn on the beginner mode for your first flight. Confirm your activation account and phone number. Click activate. Now your drone is ready to go
Mavic 2 Series Tutorial - How to Activate DJI Mavic 2
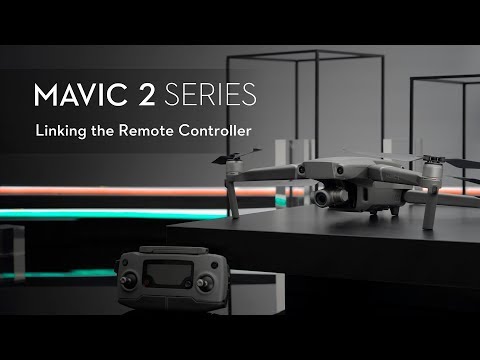
If the aircraft status indicator blinks yellow quickly it means that the remote controller cannot be connected to the aircraft and relinking is required. Power on the remote controller and the aircraft. Enter the flight interface. Tap settings, choose remote controller settings select linking remote controller and tap OK. The remote controller will make a beeping indicating the linking process has started. Press the link button on the right of the aircraft. When the beeping finishes and the aircraft status indicator stops blinking yellow, the app will display remote controller linked indicating that the linking was successful. Linking the remote controller with combination buttons. Press the C1, C2 and record button simultaneously then press the shutter button when the remote controller makes a beep. The remote controller’s LCD screen will display binding indicating the linking process has started. Press the link button on the right of the aircraft. When the beeping finishes and the aircraft status indicator stops blinking the remote controller has linked successfully.
Mavic 2 Series Tutorial - How to Link the Mavic 2 Remote Controller
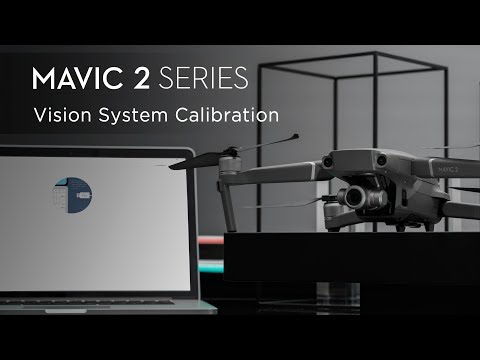
Vision sensors are equipped on the front, bottom back and sides of the Mavic 2. Power on the aircraft. Connect the drone to your PC with a USB cable. Launch DJI Assistant 2 and select Mavic 2. Click calibration on the left and watch the tutorial. Click next and click calibration now. Adjust the aircraft’s positions so the green rectangle is covered by the red one. Keep the aircraft in its current position. Slowly move the aircraft to make the rectangle move along with the blue background. After calibrating the forward vision sensors a prompt will pop up. Clock start downward camera calibration to continue. Then calibrate the backward vision sensors. After the backward visions sensors are calibrated please first fold the back arms and then calibrate the side vision sensors following the on screen instructions. After the operations, DJI Assistant 2 will automatically perform the calibration calculation. After the vision calibration is complete please restart the aircraft.
Mavic 2 Series Tutorial - How to calibrate DJI Mavic 2’s Vision System
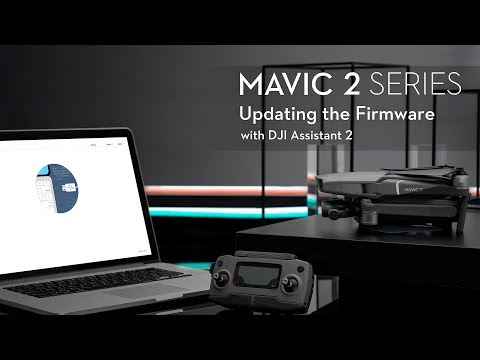
Mavic 2 Series Tutorial - Updating the Firmware with Assistant 2
Mavic 2 Series Tutorial - Updating the Firmware with Assistant 2
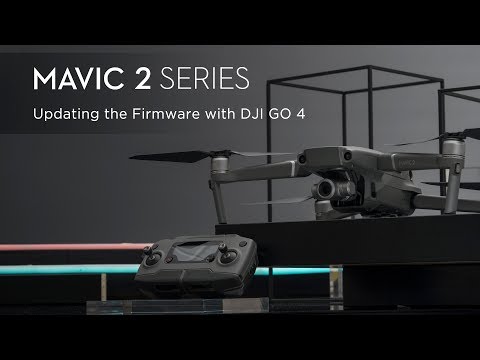
Please ensure the battery level of the aircraft and remote controller is higher than 50% before updating. Please confirm that the mobile device is connected to the internet. Connect the remote controller to the mobile device and power on the remote controller and aircraft. Launch the DJI Go 4 app. New firmware update is available notification will be shown on the app’s screen. Tap the prompt to go to the aircraft firmware download screen. Tap download now. The aircraft will download and upgrade automatically. Please do not power off the aircraft or exit DJI Go 4 during the update. The firmware update will fail if the aircraft’s or the remote controller’s battery power is less than 50%. Also it will fail if the mobile device disconnects from the aircraft or the internet. If it fails please try to update the aircraft again. It is normal for the aircraft to restart several times during the update. Please do not power off the aircraft. Once updated an update complete prompt will be shown. If you have several batteries you need to plug them into the aircraft one by one to update them. Slide slide to update to update the firmware and the battery will start updating automatically. Please restart the update after the update is complete.
Mavic 2 Series Tutorial - How to Update the Firmware with DJI GO 4
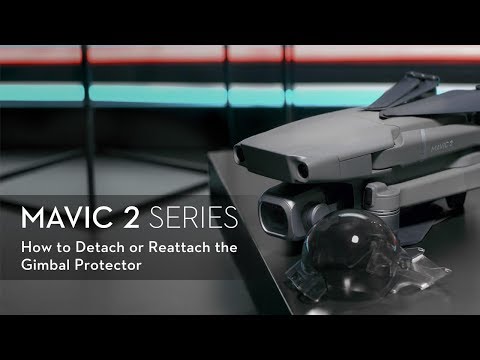
How to detach or reattach the Mavic 2’s Gimbal Protector
How to detach or reattach the Mavic 2’s Gimbal Protector
