DJI Inspire 1
Start with the remote controller. Separate videos describe linking the remote controller and calibrating the controller. Another illustrates setting the function of the controller’s C1 and C2 buttons. One video coaches you on shooting tips and calibrating the Zenmuse X5, which enhances manual focus, and another shows how to mount the X5 gimbal and mounting plate. Another shows how to install and use the Zenmuse Z3 with its zoom lens. The Inspire 1 can use dual controllers, for pilot and photographer; the “Set Master and Slave RC” video shows how. Find firmware updating tips on the remote controller and aircraft in separate videos.
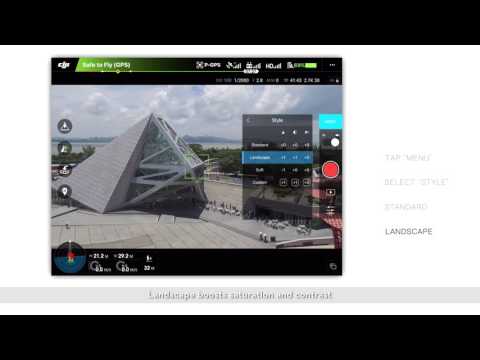
This video will show you how to install use your Zenmuse Z3 camera. Installing the Zenmsue Z3. Open the camera packaging, take out the camera. Rotate and unlock the gimbal. Remove the gimbal cap. Align the gimbal with the white lines on the base and attach it. Following the arrow, rotate the gimbal lock to the locked position. Finally ensure a micro SD has been inserted into the camera. Taking pictures. To take a single photo slide the photo/video switch to the left and tap the shutter/record button. To select another shooting mode tap menu and select photo. In burst mode you can take 3, 5 or 7 pictures in a row. In AEB mode you can take 3 or 5 photos with varying degrees of exposure. This can help ensure 1 of the shots is correctly exposed or allow you to create HDR images. In tome lapse mode photos can be taken at 5, 7, 10, 10 or 30 second intervals. Recording video. Slide the photo/video switch to the right and tap the shutter/record button to start or stop recording. Using advanced settings. To choose an exposure ode tap photography controls. In auto mode the shutter speed and aperture are set automatically to obtain correct exposure. In shutter priority mode set a desired shutter and the camera will adjust aperture automatically. This mode is ideal for freezing motion or creating motion blur. In manual exposure (M) mode increase the ISO in low light environments and decrease the ISO in bright environments. Styles. Tap menu and select style to choose from 4 picture styles. Standard is a general purpose style good for most situations.
Landscape boots saturation and contrast. Soft lowers saturation and gives a muted, natural feel. Custom allows you to set sharpness, contrast and saturation manually. Sharpness affects an images clarity. Decreasing sharpness will produce softer images. While increasing sharpness will produce clearer images. Contrast affects the difference between bright and dark areas of an image. Decreasing contrast produces flatter images while increasing contrast produces more vibrant images. Saturation affects the intensity of colors in an image. Increasing saturation will yield more vibrant colors. White balance. Tap menu and select white balance to choose from 3 modes. Auto will adjust the white balance automatically. Choose sunny, cloudy incandescent or neon if you can’t get natural looking color by adjusting the picture style. Custom allows you to set a Kelvin temperature to compensate for light from a specific source. Zooming. The Zenmuse Z3 has 7x zoom. Tap the T and W buttons to zoom in the app. You can also zoom by pressing the C2 button on your remote controller and rotating the gimbal dial. Adjust the camera’s tilt using the gimbal dial
How to Install and Use the Zenmuse Z3
This video will you how to update the remote controller firmware. Before the update ensure the aircraft is powered off. Ensure that the Inspire 1’s aircraft firmware has been updated to the latest version. Otherwise the remote controller cannot link to the aircraft since the firmware versions will be inconsistent. Power on the remote controller. Launch DJI Go. Enter camera view. Go to aircraft status. Tap overall status. Tap download firmware. After downloading tap start upgrade. During the update if the LED on the remote controller is solid blue it is updating. When the status LED turns green from blue the update is successful. After the update is successful the current firmware version and reboot your remote controller notification will be shown in the app. If the update fails the status LED is solid red. Update it again. If upgrading fails repeatedly please contact DJI support.
DJI Inspire 1 - Updating the Remote Controller Firmware
This video will show you how to update the aircraft firmware update steps and its result analysis. Checking the firmware version. Connect the aircraft to the remote controller. Launch DJI Go. Enter camera view, go to aircraft status. Tap overall status. If the current firmware version is earlier than the newly released firmware version an update notification will pop up in the DJI Go app. Updating the firmware. Visit dji.com, download the latest firmware package. Take the Zenmuse X5 as an example. The aircraft firmware of any earlier version can be updated to the latest. The aircraft firmware can only downgrade to the previous firmware version. Unzip the download file, get the .bin file. Copy the file to the root directory of the micro SD card. Ensure that there are no other files on the Micro SD card. When the aircraft is powered off insert the micro SD card into the camera slot. Power on the aircraft. The aircraft will automatically update the firmware.
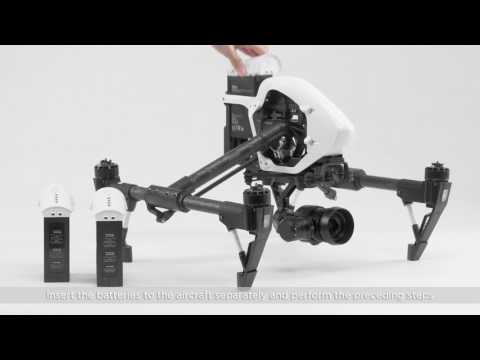
The battery in the gimbal and the camera will also be updated during the aircraft firmware update. Please note the following matters during the update: 1. If the gimbal becomes powerless continue updating and do not power off the aircraft. 2. If the rear LEDs turn on or turn off the sometimes or the color of the LED changes continue updating and do not power of the aircraft. When the aircraft makes a “D-DD sound it indicates the update is successfully. If multiple batteries need to be updated insert the batteries into the aircraft separately and perform the preceding steps. It will take about 3 minutes to update 1 battery. Checking the update result. Remove the micro SD card and insert it into the micro SD card adapter. Insert the micro SD card adapter into the PC and find out the generated .txt file on the micro SD card. Open the .txt file and check the update file. Result: success. The update is successful. Delete the .bin file on the micro SD card. Result: abort. If the firmware version is the latest there is no need to update. Delete the .bin file on the micro SD card. Result: Corrupted.
The firmware package is damaged. Go to dji.com and download the firmware package again. Result: failed. The update failed. Format the micro SD card and copy the .bin file to the micro SD card and update again. If upgrading fails repeatedly contact DJI support
Inspire 1 - Aircraft Firmware Update Steps and Its Result Analysis
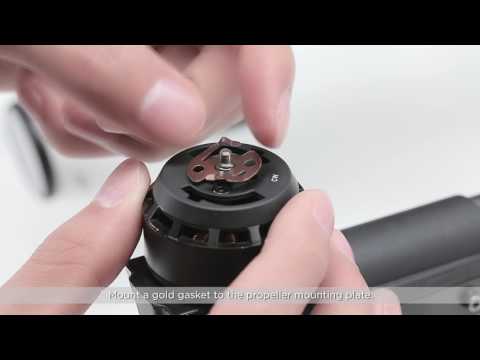
This video will show you how to mount the new Inspire 1 1345LS quick release propeller mounting plates. First remove the 2 screws on the propeller mounting plates with a screwdriver. Then remove the original propeller mounting plates and metal gaskets. Mounting the 1345LS quick release propeller mounting plates. A 1345LS quick release propeller mounting plate consists of 4 parts: propeller mount, buckle, metal gasket, base holder. The buckles and propeller mounts with white arrows are fir motors 1 and 3 along with the CCW base holders and the silver gaskets. The buckles and propeller mounts with red arrows are for motor 2 and 4 along with the CW base holders and gold gaskets. To mount a red arrow mounting plate apply a small amount of adhesive to the screw holes on motor 2. Do not let the adhesive overflow to outside the holes. Mount a CW base holder to motor 2 then tighten the screws. Apply a small amount of adhesive to the holes on the base holder. Mount a gold gasket to the propeller mounting plate. Align the holes on the gasket with the holes on the plate. Place the propeller mount onto the buckle. Rotate the propeller mount to align the red arrows. Mount the buckle and the propeller mount to the adapter. Use the screwdriver to align the holes on the base holder gasket and propeller mount. Then tighten the screws. Mount a propeller and rotate the buckle to the locked position. Hold the motor and rotate the propeller to ensure the buckle and propeller are firmly attached. Perform the preceding steps again to attach the other 3 mounting plates.
DJI Inspire 1 - Mounting the 1345LS Quick Release Propeller Mounting Plates
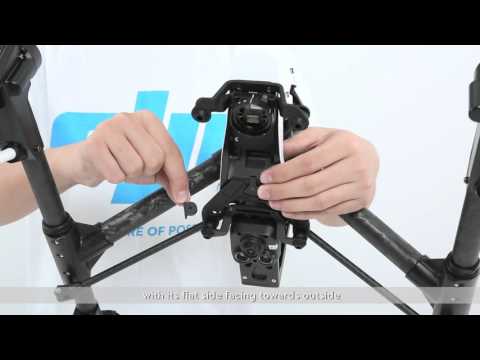
This video will show you how to install the gimbal mounting plate of the Zenmuse X5. The necessary equipment and components include: Inspire 1 aircraft, X5 camera, gimbal mounting plate, 4 landing gears support pads, 4 landing gear rubber mats, 4 hexagon socket screws, 2 rear bracket fixing plates, 1 front bracket fixing plate, 1 hexagon socket screwdriver 2.5mm. The installation steps are as follows. Rotate the gimbal lock to the unlock position. Remove the original Inspire 1 gimbal, remove the 2 black dampers at the front. Hold the plate and press the white connector. Disconnect the 10PIN cable and the 8PIN cable in order. Before not to damage the gimbal cables. Remove the other 2 back dampers. Attach the new gimbal mounting plate components to the right position. Place the rear bracket fixing plate to the rear bracket with its flat side facing towards outside. Adjust its position so that it can be aligned with the screw hole. Hold the fixing plate and turn over the aircraft. Tighten the screws with the screwdriver. Install the other rear fixing plates the same way. Connect the 8PIN cable and 10PIN cable in order. Place the front fixing bracket with its grooved side facing inside. Adjust the 8PIN and 10PIN cable to avoid extrusion. Tighten the screws. Make sure the mounting opposition and the fixing plate stay close and flat. Next assemble the X5 camera, the step are: rotate the gimbal lock to the unlocked position. Align the lever and the camera groove to connect them.
Insert the gimbal connector while aligning its white lines with the gimbal lock. Rotate the gimbal lock to the locked position. Install the landing gear support pads. Paste the rubber mat under the landing gear make it aim at the arc direction. Install the support pad and then press is gently. Install the other support pad in the same way. In order to prevent the camera from hitting the uneven ground it is necessary to install the support pad. Power on the RC. Power on the aircraft to do self-check and see if the gimbal camera is performing normally. The installation is completed successfully if the self-check is finished normally. If the self-check is abnormal please check: 1. if the cables are well connected 2. If the gimbal lock is fastened. If the problem remains after several attempts of installation please contact DJI technical support.
Inspire 1 Tutorials - How to mount the gimbal mounting plate of Zenmuse X5
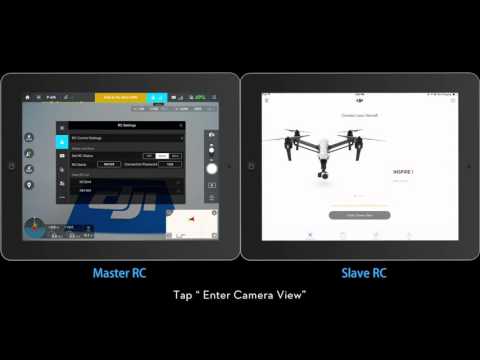
This video will introduce how to set master and slave RC of Inspire 1. Devices used in this video includes: 1 Inspire 1 aircraft, 2 RCs and 2 mobile devices. Connect the mobile devices with the RCs respectively. Turn on the aircraft and the RCs. Run the DJI Go app on the master RC. Tap enter camera view. Tap RC settings, select the master option on the RC settings. Make sure the master RC is connected to the aircraft. The RC’s indicator should be green. If the indicator is red link the RC and the aircraft first. Keep in mind the master RC’s name as well as the password. Run the DJI Go app on the salve RC. Tap enter camera view. Tap RC settings. Tap the slave option in the RC settings. Tap to search the master RC. Tap the master RC needed in the list. Enter the password. Now the salve RC is connected to the master RC. Move the stick of the slave RC to see if the gimbal camera respond normally to the command. If the 2 RCs can’t be connected please repeat the above steps. Check if you have chosen the correct master RC and entered the correct password. Check if the mobile devices are connected to RCs successfully. Check if the 2 RCs and the aircraft are of the same firmware version. If you have failed to set the RCs many times please contact DJI technical support.
Inspire 1 Tutorials - How to set master and slave RC
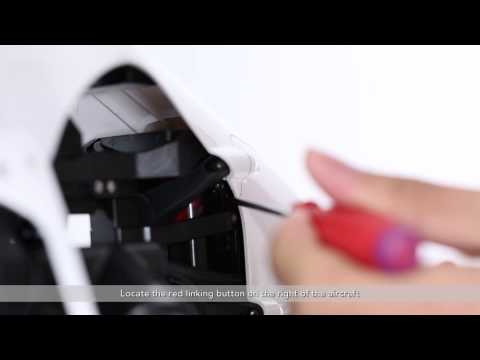
This video will show you How to link the Inspire 1 with the remote controller. First power on the remote controller and connect it to the mobile device. Then power on the aircraft. Launch the DJI Go app on your mobile device and tap camera. Tap the remote controller icon. Make sure that the remote controller is set to master mode. Tap RC control settings, choose linking remote controller. Tap OK. The app displays a count down and the remote controller starts making a beeping sound. Locate the red linking button on the right of the aircraft. Press the button for 3 seconds and then release. The app will display a message showing that the linking has succeeded and the beeping sound stops. If the linking fails please check the firmware versions of the Inspire 1 and the remote controller and make sure that they are consistent. If the firmware versions of the Inspire 1 and remote controller are consistent and the linking still fails please contact DJI after sales service.
Inspire 1 Tutorials - How to link the Remote Controller
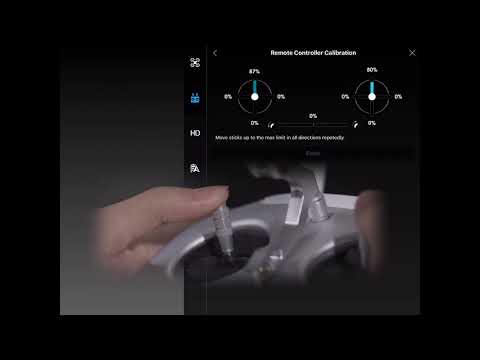
Ensure that the remote controller is not connected to the aircraft. The status LED on the remote controller is solid red. Launch the DJI GO app. Tap camera. Tap the remote controller icon on the upper right corner of the screen. Tap remote controller settings, tap remote controller calibration. Tap calibrate and start. Read the warning prompt and tap OK. The remote controller will make “DDD’ sounds. Move the control sticks throughout their maximum limit in all directions as shown. Turn the dial throughout its maximum limit to the left and right as shown. Tap finish and the remote controller will make “DDD” sounds. The calibration is complete.
DJI Quick Tips - Inspire 1 - Calibrating the Remote Controller
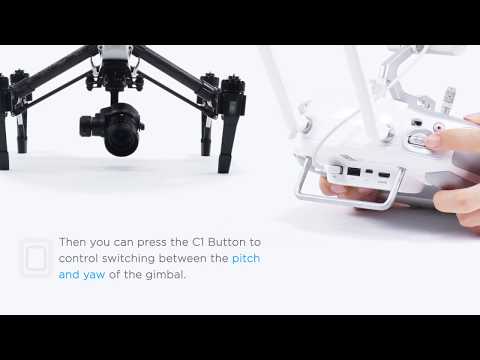
Launch DJI Go app. Tap the camera button to enter camera view. Tap the icon on the upper right corner on the screen to enter general settings. Go to remote controller settings, remote controller settings. Set the C1 button to gimbal pitch/yaw. Then you can press the C1 button to control switching between the pitch and yaw of the gimbal.
Setting the C1 Button or C2 Button on the Remote Controller
This video will discuss lens calibration and give you some shooting tip for your Zenmuse X5 camera. Lens calibration. Why do X5 lens need calibration? Before using manual focus for the first time lens calibration will allow you to quickly switch to infinity focus. Calibration allows you to focus in app more effectively. When should I calibrate my lens? After switching lens. After initial calibration if objects aren’t in focus after pressing the infinity button or manually switching to infinity focus please recalibrate. Please calibrate Zenmuse X5 lenses when using them for the first time. It is recommended to calibrate using distant objects after takeoff. Zenmuse X5 lens calibration steps. Power on the remote controller and the aircraft. Open the DJI Go app and enter the Inspire 1’s camera interface. You will be prompted to calibrate the lens when using manual focus for the first time. Make sure to switch to auto focus before calibrating. Please push the AF/MF button on the top right corner of the video downlink interface. When the app prompts you to calibrate the lens please press tart. Point the lens towards the horizon, select a high contrast object at least 50m away in the view finder. Click OK and finish calibration. If you chose an object that’s too close the app will let you know; please choose an object that’s further away.
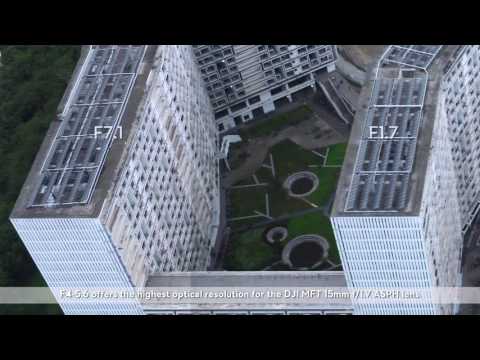
Zenmuse X5 shooting tips. When shooting landscapes using the Zenmuse X5 it is recommended to use A mode or aperture priority mode. On clear sunny days when light levels are sufficient ISO can be switched to auto mode. The recommended apertures for landscape photography are between F5 and F8. F4 – 5.6 offers the highest optical resolution for the DJI MFT 15mm f/1.7 ASPH lens. You can lower the aperture if looking for a shallower depth of field. For still images taken at night ISO should be between 200 and 800. Videos shot at night should be above 800 ISO. Low ISOs will render images finely without much noise. High ISOs will render rougher images with greater noise. Please choose an ISO according to the shooting environment and set suitable parameters for clear images. How to switch from AF to MF. Please switch the AF/MF switch on the camera to AF. Open the DJI Go app. Enter the video downlink interface. Following previous steps finish calibration. Click AF/MF in the top right corner to switch focus modes. Focus peaking. It is recommended to use focus peaking to obtain sharper focus. Open general settings and select focus peaking and set a percentage value. The higher the percentage the more edges of interest will be detected and highlighted. Please choose a suitable percentage for your situation.
AF/MF focus assist. It is recommended to turn on AF/MF assist for increasing accuracy of focusing. Open the camera menu, push general settings and open AF/MF focus assist. Using AF or MF to focus. The focus area on the screen will be magnified to help you focus accurately.
Inspire 1 Tutorials - Zenmuse X5 Lens Calibration and Shooting Tips
