DJI Inspire 2
Instructional videos ease the learning curve for the Inspire 2, which accepts interchangeable cameras and lenses. Start with “Linking the Aircraft and Controller” and “Activating the Aircraft.” Move on to separate videos for upgrading the aircraft firmware and controller firmware. Videos also appear for mounting a gimbal camera and CINESSD, mounting a Zenmuse X7 lens and balancing the gimbal, and mounting an X5s balancing ring. More tips appear on videos for mounting the quick-release propellers, propeller guards, gimbal protection set and handle grips. One other video shows how to replace the gimbal dampers to maintain vibration absorption.
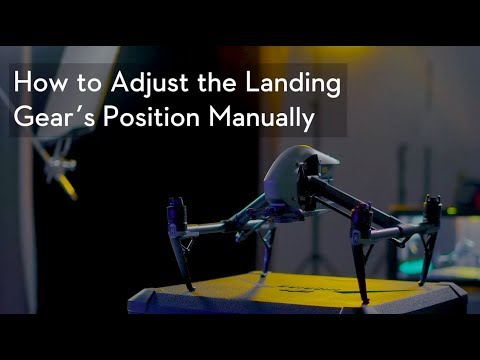
How to Adjust the Landing Gear’s position manually?
First, you need a flat head screwdriver. Align the screw driver with the hole on the bottom of the aircraft. Turn it clockwise to lower the landing gear. Turn it counterclockwise to raise the landing gear.
How to Adjust the Inspire 2 Landing Gear´s Position Manually
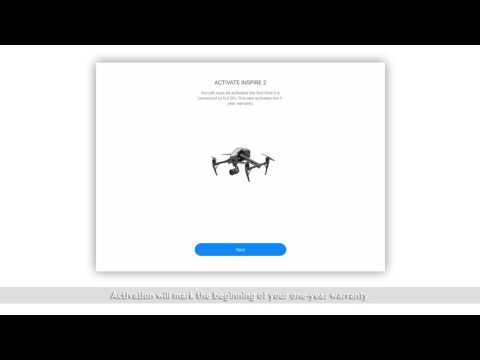
This video will show you how to activate your Inspire 2. Connect the mobile device and remote controller with a USB cable. Power on the remote controller and the Inspire 2. Ensure that your mobile device is connected to the internet. Launch DJI Go 4 an activation prompt will pop up. You’ll need to activate your Inspire 2 when connecting with DJI Go 4 for the first time. Activation will mark the beginning of your 1 year warranty. Tap next can name your Inspire 2. You can change the name later in the app if you so choose. Tap continue, then choose a stick mode. The default mode is mode 2. You can set a customized mode under remote controller setting after activation. Tap continue. Then select your desired measurement system and video standard.
Tap continue to continue to confirm your account’s email address. Please note that the account that you use to activate your Inspire 2 cannot be changed later. The aircraft’s information will be bound to your account permanently and your account will serve as proof of warranty when you apply for service. Tap activate. After your Inspire 2 has been activated successfully and new firmware is available tap update firmware to update
DJI Inspire 2 - Activating the Inspire 2
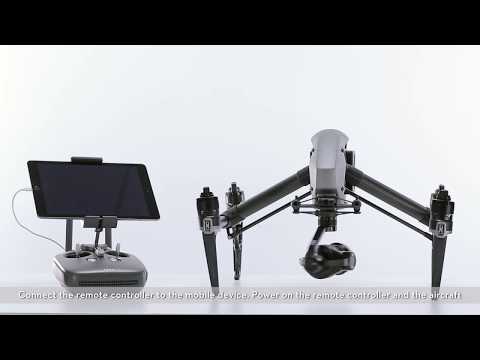
This video will show you how to link your Inspire 2 with its remote controller. All Inspire 2 remote controller are linked to the aircraft before delivery. But if the aircraft status indicator flashes yellow quickly and the indicator on the remote is solid red the remote controller needs to be linked to the aircraft. There are 2 ways to link the aircraft with the remote controller. 1. Linking RC with DJI Go 4. Connect the remote controller to the mobile device. Power on the remote controller and the aircraft. Launch DJI Go 4 and press the RC icon in the top of the screen to enter the remote controller settings. Then select linking controller. The remote controller will beep and the indicator will flash blue indicating that it’s ready to link. The RC will be primed to link for 60 seconds. Press the pair button on the front of the aircraft. The linking status indicator will flash red quickly. Linking is complete when the pair button and remote controller indicator turn green. 2. Linking without a mobile device. Power on the remote controller and the aircraft. Then press the C1, C2 and record button at the same time. When the remote controller starts beeping press the pair button on the aircraft. Ensure that the firmware of the aircraft and remote controller is upgraded to the latest version. It is recommend to upgrade to the latest firmware. If the remote controller is in slave mode linking will not work. Please set the remote controller to master mode. If linking fails reboot the aircraft and try again. If linking fails repeatedly please contact DJI support.
DJI Inspire 2 - Linking the Aircraft and the Remote Controller
This video will show you how to upload the firmware for your Inspire 2’s remote controller. Power on the remote controller. Connect the remote controller to your mobile device with a USB cable. Please make sure your mobile device is connected to a mobile or Wi-Fi network. Launch DJI Go 4. When remote controller firmware needs to be upgraded a notification will be displayed in the app. Tap update now. When downloading is complete tap start update. The app will display the update’s progress and beep. Once upgraded restart the remote controller. Please note the following: 1. The remote controller’s battery should be fully charged before upgrading. 2. Please make sure that your mobile device stays connected to the internet while the firmware is downloading. 3. If the upgrade fails try upgrading again. If upgrading fails repeatedly please contact DJI support
DJI Inspire 2 - Upgrading Remote Controller Firmware
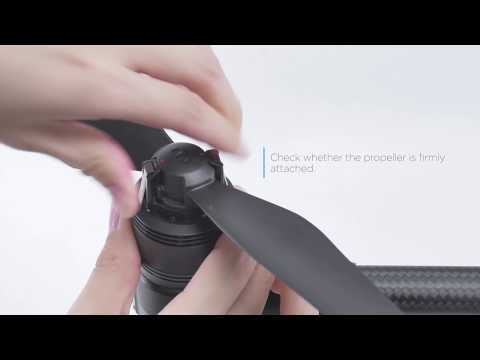
Press down the spring pads on both aides and rotate the propeller lock. Align the arrows on the propeller base with the arrows on the propeller lock as shown. Press down the propeller and rotate the propeller lock. Align the arrows on the propeller with the arrows on the propeller lock. Check whether the propeller is firmly attached.
Mounting a 1550T Quick Release Propeller
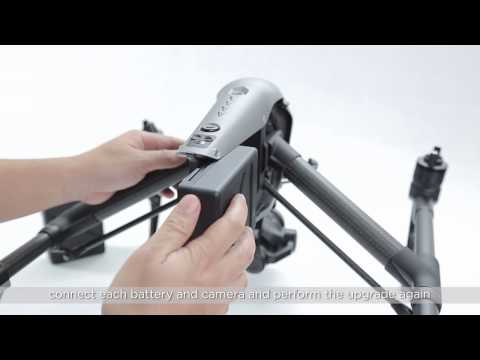
This video will show you how to upgrade the aircraft firmware for your Inspire 2. There are 2 ways to upgrade the firmware. Upgrading with DJI Go 4. When the aircraft firmware needs to be upgraded a notification will be displayed in the app. Power on the aircraft. Connect your mobile device to the aircraft with a USB cable and toggle the USB mode switch to mobile device mode. Launch DJI Go 4. Tap update now. When downloading is complete the firmware will automatically start to upgrade. The aircraft will beep and the app will display the upgrade’s progress. Once upgrade the aircraft will restart automatically. Upgrading with DJI Assistant 2. Power on the aircraft. Toggle the USB mode switch to the PC mode. Connect the aircraft to your PC or Mac with the dual USB cable. Launch DHI Assistant 2. Enter your account and password to log in. click the Inspire 2 box to enter the home screen. Click firmware update a firmware list will be displayed. All firmware versions and their release dates are shown in the list. Select the newest firmware version and click to upgrade. When downloading is complete the firmware will automatically start to upgrade. Once upgrade the aircraft will restart automatically. Please note the following: the aircraft’s battery should be fully charged before upgrading and the propellers should be removed. Please make sure that your mobile device is connected to the internet when the firmware is downloading. If you have multiple batteries of another gimbal camera connect each battery and camera and perform the upgrade again. Upgrading additional batteries and cameras doesn’t require connection to a PC or Mac. If the upgrade fails try upgrading again. If the upgrade fails repeatedly please contact DJI support.
DJI Inspire 2 - Upgrading Aircraft Firmware

This video will show you how to mount the Zenmuse X7 camera lens and balance the gimbal. Remove the camera’s body cap and rear cap. Keep the lens mount facing downwards to prevent dust from entering before aligning the 2 lens mounting indexes on the camera and lens. Once the lens is aligned insert it into the camera. Rotate the lens clockwise until you hear a click. Do not press the lens release button while rotating the lens. Rotate the lens counter clockwise to make sure it is firmly attached. Mount the Zenmuse X7 to an aircraft and rotate the gimbal lock to the locked position to align the red dots. Before use make sure that the gimbal is balanced. It is recommend to use a lens hood and filter or 2 filter when balancing the gimbal. Note: 1. Use a UV or ND filter with a diameter or 46mm, a weight between 10 – 12g and a thickness of 4.4mm. 2. The lens hood must be compatible with the lens to avoid affecting the shooting
DJI Inspire 2 - Mounting the Zenmuse X7 Camera Lens and Balancing the Gimbal

Take the Panasonic Lumix GX Vario PZ 14-42mm f/3.5-5.6 Power O.I.S lens as an example. Mount the BR-037-17 balancing ring. Then mount the BR-037-6 balancing ring. The installation is complete and the Zenmuse X5S can be used normally. To mount a filter, remove the BR 0-37-6 balancing ring first and then mount the corresponding filter. For the Olympus M.Zuiko 9-18mm/4.0-5.6 lens the BR-052-10 balancing ring and BC-060-78 balancing cap need to be mounted. For other lenses refer to the Zenmuse X5S user manual v1.2 to mount the corresponding balancing ring.
DJI Quick Tips - Inspire 2 - Mounting the Zenmuse X5S Balancing Ring
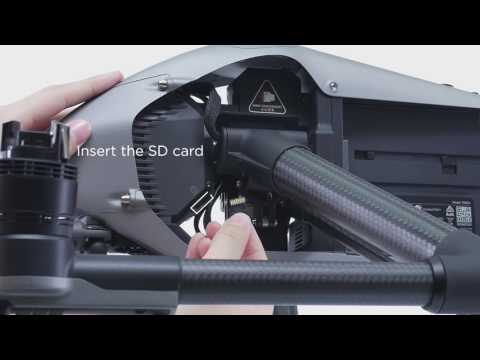
Inspire 2, mounting a gimbal camera and a CINESSD. Press the gimbal and camera release button. Remove the gimbal cap from the Inspire 2. Align the white dot on the gimbal with the red dot on the mounting. Attach the gimbal. Rotate the gimbal lock to the locked position. Insert the SD card. Remove the SSD cover. Insert the CINESSD. The arrow should face upwards as shown here.
DJI Quick Tips - Inspire 2 - Mounting a Gimbal Camera and a CINESSD

Inspire 2, mounting and using propeller guards. Prepare the 2 CW propeller guards and the 2 CCW propeller guards. Attach the CW propeller guards to the motor CW and attach the CCW propeller guard to the motor CCW. Ensure that the propellers are not mounted the aircraft. Ensure that the aircraft is not powered on. Release the buckle. Mount the propeller guard from the top of the frame arm and slide the propeller guard to the end as shown. Fasten the buckle and make sure it securely wraps around the landing gear support rod. Tighten the screw to lock the propeller guard tightly. Perform the preceding steps to mount other propeller guards to their matching arms. Note that the propeller guards may affect the flight performance and flight time. For safety reasons pay attention to the warning displayed in the app.
DJI Quick tips - Inspire 2 - Mounting and Using Propeller Guards
Inspire 2, mounting and using the handle grips. Prepare the Inspire 2 handle grips and aircraft. Ensure that the aircraft is powered off and it is in landing mode. Attach the lock to the frame arm as shown. Make the white mark face the aircraft’s nose direction. Ensure that the direction of the installation matches with that of the stiffeners as shown. Secure the 2 screws. Rotate the securing ring on the handle to the unlock position and make sure that the white line is aligned with the white dot on the lock. Insert the handle. Rotate the securing ring to the locked position and ensure that the white line is aligned with the red dot. Perform the same steps to install the remaining lock and handle on the other side. Ensure that the lock is mounted properly. Otherwise it may affect the landing gear when rising and lowering. The handle can be removed when storing the aircraft in the carrying case. For safety reasons when handled shooting or recording ensue that the motors are off and the propellers are removed.
DJI Quick tips - Inspire 2 - Mounting and Using the Handle Grips

Inspire 2, mounting the gimbal protection set. To avoid the Zenmuse X7 gimbal coming off due to an aged or loose gimbal dampers it is recommended that you mount the Inspire 2 gimbal protection set to the gimbal vibration absorbing board. Place the buckle fixing base to the raised part in the gimbal vibrating absorbing board’s mounting slot and ensure that it is locked firmly. Pre tighten the 2 screws with a T8 screwdriver. Ensure that the buckle is placed firmly and then tighten the screws. Remove the 2 fixing screws on the bottom of the aircraft take a screw from the gimbal protection set and insert it through one of the loops on the end of the steel cable and then tighten the screw to the bottom of the aircraft. Perform the same steps to mount the other screw. Check whether all the screws are tightened firmly. Move the vibration absorbing board to ensure that the gimbal protection set work normally.
DJI Inspire 2 | Mounting the Gimbal Protection Set

Inspire 2, replacing the gimbal dampers. Replace the dampers if they are damaged not flexible or cracked. Remove the dampers’ fixing pieces in the forward visions bracket with a Phillips screwdriver. Remove the 3 dampers from the gimbal vibration absorbing board. Do not damage the gimbal quick release port data cable. Mount the new dampers to the gimbal vibration absorbing board. Pay close attention to the installation direction. Ensure that the dampers are mounted in place. Mount the fixing pieces. Pull out the vibration absorbing board and check whether the dampers are firmly attached. Trim off the excess part of the dampers. If they’ve been used 120 times or more than 40 hours it is recommended that you replace the dampers.
DJI Inspire 2 - Replacing the Gimbal Dampers
